Ada kasus terjadinya penularan COVID19 di sebuah apartement. Kemungkinan transmisi virus tersebut adalah melalui saluran ventilasi.
Lokasi: Seoul, Korea Selatan
Waktu: Agustus 2020
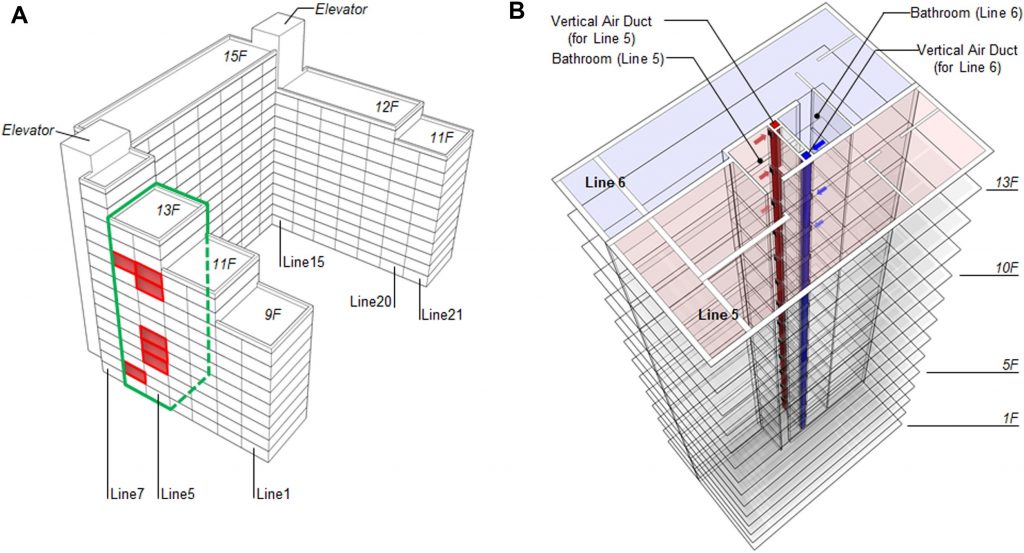
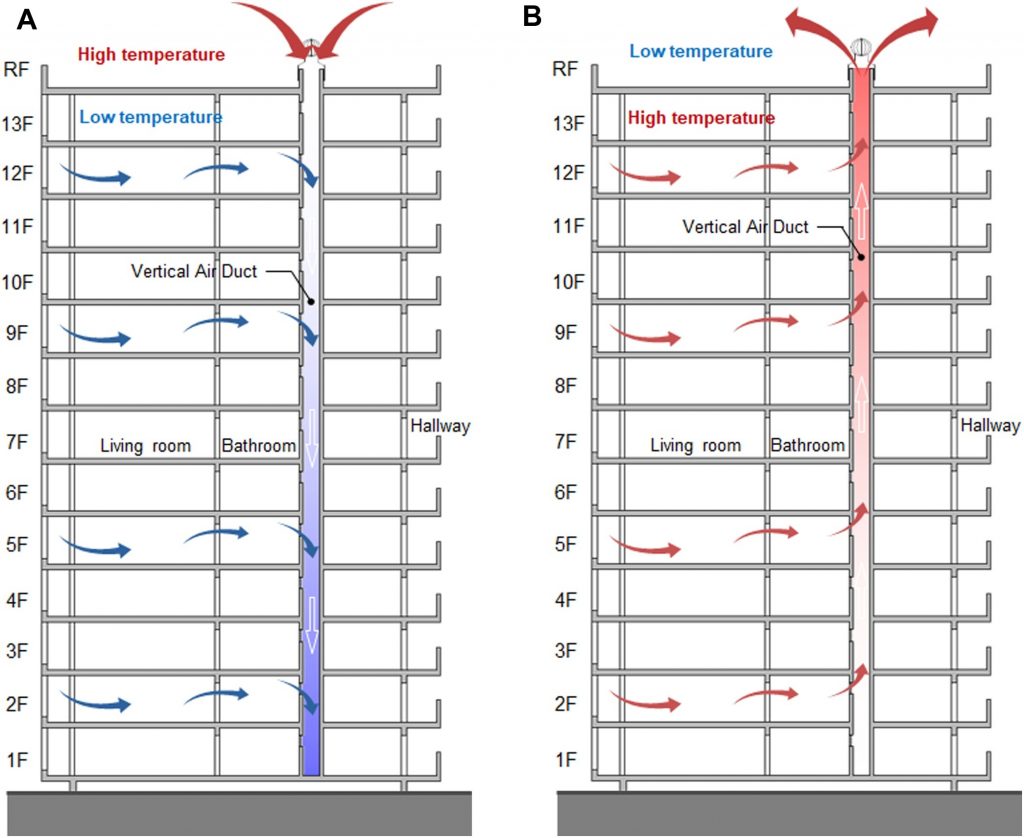
Ada kasus terjadinya penularan COVID19 di sebuah apartement. Kemungkinan transmisi virus tersebut adalah melalui saluran ventilasi.
Lokasi: Seoul, Korea Selatan
Waktu: Agustus 2020


Web server Apache akan menjadi lambat / hang jika diakses oleh terlalu banyak client, sedangkan memori sudah habis. Akan terjadi permintaan memory swap yang besar sehingga semuanya akan semakin lambat. Pada akhirnya koneksi akan terputus. Untuk membatasi jumlah client, dapat digunakan setting “MaxRequestWorkers”.
Berikut ini salah satu contoh setting untuk server yang memorynya sedikit.
<IfModule mpm_worker_module>
	ServerLimit         5
	StartServers         2
	MaxRequestWorkers  20
	MinSpareThreads     5
	MaxSpareThreads     5
	ThreadsPerChild     5
</IfModule>Perangkat lunak jaringan dapat diimplementasikan dengan beberapa cara. Pertama dapat menggunakan arsitektur monolitik, di mana semua fungsi digabung di sebuah modul besar. Cara kedua adalah dengan memisahkan fungsi-fungsi tersebut menjadi beberapa modul, dengan setiap modul dapat berinteraksi dengan modul lain. Cara ketiga adalah dengan memisahkan fungsi-fungsi tersebut menjadi beberapa modul, dan modul disusun dengan lapisan (layer) dengan suatu hirarki tertentu, sehingga 1 modul hanya dapat berkomunikasi dengan 1 modul di atasnya.
Berikut ini struktur lapisan/ layering pada sistem komunikasi pada 2 buah host/perangkat.
Penomoran lapisan dimulai dari bawah. Layer paling bawah adalah medium fisik, dapat berupa kabel tembaga, fiber optic, wireless dan sebagainya.
Setiap perangkat memiliki susunan layer/lapisan yang sama. Antara setiap layer terdapat interface (antar muka) yang terdefinisi dengan baik. Layer 5 hanya berkomunikasi dengan layer 4. jadi layer 5 tidak tahu dan tidak perlu tahu teknis detail di layer 3,2 dan fisik. Layer 5 di host 1 seakan-akan berkomunikasi dengan layer 5 di host 2 , walaupun sebenarnya data yang dikirim akan melewali layer-layer di bawahnya.
Setiap layer akan memproses header/trailer pada data yang melaluinya. Pada waktu data dikirim, header atau trailer akan ditambahkan pada data yang dikirim. Pada proses penerimaan, header atau trailer tersebut dipotong, tidak diteruskan ke layer di atasnya.
Berikut ini adalah contoh aliran data dari suatu mesin sumber (source machine) ke mesin tujuan (destination machine). Data M di source dibuat di layer 5. Data ini kemudian dikirimkan ke layer 4. oleh layer 4, data ini ditambahi fitur-fitur tertentu, sesuai dengan tugas layer 4 tersebut. Misalnya adalah dengan ditambah error detection. Fitur error detection ini perlu tambahan data, misal untuk pengecekan parity atau CRC (cyclic redundancy check). data untuk error detection dan data-data lain terkait layer 4 ditambahkan sebagai H4 (header layer 4). H4+M ini kemudian dikirimkan ke layer berikutnya: layer 3. Di layer 3 proses serupa dilakukan, dan layer 3 menambahkan H3, sehingga sekarang data yang dikirim menjadi H3+H4+M. Demikian juga diteruskan di layer 2.
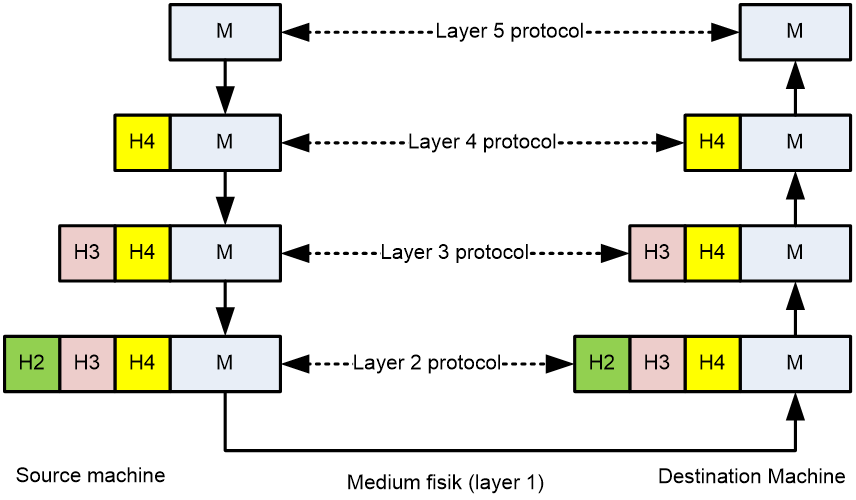
Pada akhirnya data yang betul-betul dikirim secara fisik melalui medium fisik adalah H2+H3+H4+M, dan data ini diterima di destination machine.
pada proses penerimaan di destination machine, proses sebaliknya dilakukan, yaitu header di setiap layer diproses sesuai dengan fitur pada layer tersebut, dan header tersebut dibuang. data yang sudah dibuang headernya dikirim ke layer di atasnya. Jadi di sini misalnya pada layer 2 akan memproses H2 dan membuangnya. sehingga layer 3 akan menerima H3+H4+M. Demikian seterusnya di layer 3.
Pada layer 4, H4 diproses. Jika misalnya di pengiriman H4 berisi kode error detection, maka error detection akan dicek di layer 4 ini. jika hasilnya sesuai, maka data M akan dikirimkan ke layer 5 di destination. jika hasilnya tidak sesuai, maka data tersebut akan dibuang atau diminta untuk dikirim ulang dari source machine, tergantung mekanisme protokol yang dipilih.
Salah satu layanan dari layer komunikasi adalah layer atas tidak perlu tahu dan dibatasi oleh kondisi layer bawah. Secara sistem engineering hal ini disebut sebagai ‘abstraksi’.
Sebagai contoh adalah masalah ukuran data. Dari sisi pemakai atau pembuat aplikasi tentunya hanya ingin mengirim data dengan ukuran berapapun, tidak ingin direpotkan dengan pembatasan ukuran data. sedangkan di sisi fisik hanya mampu mengirim data dengan ukuran data.
Misal Wifi maksimum 2346 byte, dan kabel ethernet maksimuk 1536 byte. akan repot bagi user ketika ingin browsing ke suatu situs, tapi harus memilih ukuran data maksimum 2346 byte atau 1536, tergantung jaringannya sedang menggunakan kabel, atau tethering via wireless ke smartphone.
Dalam contoh ini layer 3 tidak sanggup mengirim data M secara utuh, sehingga data harus dipisahkan menjadi 2 segmen, yaitu M1 dan M2, kemudian masing=masing bagian ini dikirim sebagai 2 pesan terpisah: M1 dan M2 ke layer 3. Layer 3 H4+M , namun memecahnya menjadi 2 bagian: H3+H4+M1 dan H3+M2. Layer 2 meneruskan keduanya tanpa tahu bahwa M1 dan M2 sebenarnya berhubungan. layer fisik juga hanya meneruskannya saja.
Di penerima, kedua pesan yang mengandung M1 dan M2 ini diterima sampai ke layer 3 seperti biasa. Di layer 3 kedua pesan M1 dan M2 digabung, kemudian baru dikirim ke layer 4. Dalam prakteknya dapat saja kedua pesan M1 dan M2 tersebut sampai tidak berurutan atau ada yang hilang, sehingga layer 3 perlu melakukan tindakan-tindakan untuk mengatasinya.
Aliran Data Dengan Perantara
Gambar sebelumnya menunjukkan aliran data antara 2 perangkat saja. Dalam prakteknya, jaringan melibatkan 1 atau lebih perangkat penghubung (connecting device) sebagai perantara, seperti switch dan router.
Pada gambar ini, terdapat sumber (source) A yang mengirimkan data ke tujuan (destination) B.
Model jaringan yang dipakai di sini adalah TCP/IP, dengan layernya adalah pysical, datalink, network, transport dan application.
Di antara keduanya terdapat switch dan router. switch di sini fungsinya menghubungkan secara fisik antara source ke router, dan router ke destination. Di dalam switch dan router terdapat juga layer-layer jaringan.
Pada switch, layer yang diurus adalah fisik sampai ke datalink.
Pada router, layer yang diurus adalah fisik sampai ke network. Pada source dan destination, layernya ada lengkap, dari physical sampai application.
Perangkat lunak jaringan dapat diimplementasikan dengan beberapa cara. Pertama dapat menggunakan arsitektur monolitik, di mana semua fungsi digabung di sebuah modul besar. Cara kedua adalah dengan memisahkan fungsi-fungsi tersebut menjadi beberapa modul, dengan setiap modul dapat berinteraksi dengan modul lain. Cara ketiga adalah dengan memisahkan fungsi-fungsi tersebut menjadi beberapa modul, dan modul disusun dengan lapisan (layer) dengan suatu hirarki tertentu, sehingga 1 modul hanya dapat berkomunikasi dengan 1 modul di atasnya.
Berikut ini struktur lapisan/ layering pada sistem komunikasi pada 2 buah host/perangkat.
Penomoran lapisan dimulai dari bawah. Layer paling bawah adalah medium fisik, dapat berupa kabel tembaga, fiber optic, wireless dan sebagainya.
Setiap perangkat memiliki susunan layer/lapisan yang sama. Antara setiap layer terdapat interface (antar muka) yang terdefinisi dengan baik. Layer 5 hanya berkomunikasi dengan layer 4. jadi layer 5 tidak tahu dan tidak perlu tahu teknis detail di layer 3,2 dan fisik. Layer 5 di host 1 seakan-akan berkomunikasi dengan layer 5 di host 2 , walaupun sebenarnya data yang dikirim akan melewali layer-layer di bawahnya.
Setiap layer akan memproses header/trailer pada data yang melaluinya. Pada waktu data dikirim, header atau trailer akan ditambahkan pada data yang dikirim. Pada proses penerimaan, header atau trailer tersebut dipotong, tidak diteruskan ke layer di atasnya.
Berikut ini adalah contoh aliran data dari suatu mesin sumber (source machine) ke mesin tujuan (destination machine). Data M di source dibuat di layer 5. Data ini kemudian dikirimkan ke layer 4. oleh layer 4, data ini ditambahi fitur-fitur tertentu, sesuai dengan tugas layer 4 tersebut. Misalnya adalah dengan ditambah error detection. Fitur error detection ini perlu tambahan data, misal untuk pengecekan parity atau CRC (cyclic redundancy check). data untuk error detection dan data-data lain terkait layer 4 ditambahkan sebagai H4 (header layer 4). H4+M ini kemudian dikirimkan ke layer berikutnya: layer 3. Di layer 3 proses serupa dilakukan, dan layer 3 menambahkan H3, sehingga sekarang data yang dikirim menjadi H3+H4+M. Demikian juga diteruskan di layer 2.

Pada akhirnya data yang betul-betul dikirim secara fisik melalui medium fisik adalah H2+H3+H4+M, dan data ini diterima di destination machine.
pada proses penerimaan di destination machine, proses sebaliknya dilakukan, yaitu header di setiap layer diproses sesuai dengan fitur pada layer tersebut, dan header tersebut dibuang. data yang sudah dibuang headernya dikirim ke layer di atasnya. Jadi di sini misalnya pada layer 2 akan memproses H2 dan membuangnya. sehingga layer 3 akan menerima H3+H4+M. Demikian seterusnya di layer 3.
Pada layer 4, H4 diproses. Jika misalnya di pengiriman H4 berisi kode error detection, maka error detection akan dicek di layer 4 ini. jika hasilnya sesuai, maka data M akan dikirimkan ke layer 5 di destination. jika hasilnya tidak sesuai, maka data tersebut akan dibuang atau diminta untuk dikirim ulang dari source machine, tergantung mekanisme protokol yang dipilih.
Salah satu layanan dari layer komunikasi adalah layer atas tidak perlu tahu dan dibatasi oleh kondisi layer bawah. Secara sistem engineering hal ini disebut sebagai ‘abstraksi’.
Sebagai contoh adalah masalah ukuran data. Dari sisi pemakai atau pembuat aplikasi tentunya hanya ingin mengirim data dengan ukuran berapapun, tidak ingin direpotkan dengan pembatasan ukuran data. sedangkan di sisi fisik hanya mampu mengirim data dengan ukuran data.
Misal Wifi maksimum 2346 byte, dan kabel ethernet maksimuk 1536 byte. akan repot bagi user ketika ingin browsing ke suatu situs, tapi harus memilih ukuran data maksimum 2346 byte atau 1536, tergantung jaringannya sedang menggunakan kabel, atau tethering via wireless ke smartphone.
Dalam contoh ini layer 3 tidak sanggup mengirim data M secara utuh, sehingga data harus dipisahkan menjadi 2 segmen, yaitu M1 dan M2, kemudian masing=masing bagian ini dikirim sebagai 2 pesan terpisah: M1 dan M2 ke layer 3. Layer 3 H4+M , namun memecahnya menjadi 2 bagian: H3+H4+M1 dan H3+M2. Layer 2 meneruskan keduanya tanpa tahu bahwa M1 dan M2 sebenarnya berhubungan. layer fisik juga hanya meneruskannya saja.
Di penerima, kedua pesan yang mengandung M1 dan M2 ini diterima sampai ke layer 3 seperti biasa. Di layer 3 kedua pesan M1 dan M2 digabung, kemudian baru dikirim ke layer 4. Dalam prakteknya dapat saja kedua pesan M1 dan M2 tersebut sampai tidak berurutan atau ada yang hilang, sehingga layer 3 perlu melakukan tindakan-tindakan untuk mengatasinya.
Gambar sebelumnya menunjukkan aliran data antara 2 perangkat saja. Dalam prakteknya, jaringan melibatkan 1 atau lebih perangkat penghubung (connecting device) sebagai perantara, seperti switch dan router.
Pada gambar ini, terdapat sumber (source) A yang mengirimkan data ke tujuan (destination) B.
Model jaringan yang dipakai di sini adalah TCP/IP, dengan layernya adalah pysical, datalink, network, transport dan application.
Di antara keduanya terdapat switch dan router. switch di sini fungsinya menghubungkan secara fisik antara source ke router, dan router ke destination. Di dalam switch dan router terdapat juga layer-layer jaringan.
Pada switch, layer yang diurus adalah fisik sampai ke datalink.
Pada router, layer yang diurus adalah fisik sampai ke network. Pada source dan destination, layernya ada lengkap, dari physical sampai application.
Pada komunikasi data melalui layer-layer tersebut, terjadi proses penambahan header dan pemotongan header. Proses penambahan header disebut juga sebagai proses encapsulation. Pada proses ini data dari layer di atasnya seakan-akan ‘dibungkus’ dengan header yang ditambahkan. Pada bagian penerimaan data, terjadi proses pemotongan header. Proses ini disebut sebagai ‘decapsulation’. Pada proses ini seakan-akan ‘bungkus’ dari layer tersebut dibuka, kemudian isi dari ‘bungkus’ tersebut dikirmkan ke layer di atasnya.
Suatu komputer atau perangkat dapat berkomunikasi ke perangkat lain melalui suatu media fisik. Untuk dapat berkomunikasi, perlu ada protokol-protokol dengan sejumlah algoritma tertentu. Protokol-protokol tersebut dilaksanakan oleh suatu modul komunikasi pada komputer / perangkat tersebut.
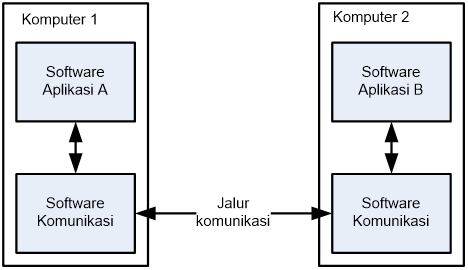
Berikut ini adalah uraian fungsi-fungsi yang perlu ditangani oleh suatu modul komunikasi. Fungsi-fungsi ini dalam prakteknya tersebar di perangkat keras dan perangkat lunak.
Aspek keandalan di sini maksudnya adalah apakah data dapat diterima dengan baik. Agar data dapat diterima dengan baik, perlu ada pendeteksian kesalahan (error detection), misal yang sederhana dengan parity. Ada juga algoritma yang selain mampu mendeteksi kesalahan pada data, dapat juga sekaligus memperbaiki kesalahan tersebut. Prinsipnya adalah dengan mengirimkan data lebih banyak daripada yang diperlukan, sehingga kalau ada kesalahan maka dapat dilakukan perbaikan (recovery).
Jika data rusak tidak dapat diperbaiki, maka perlu ada mekanisme untuk melakukan pengiriman ulang data tersebut.
Jalur komunikasi pada jaringan juga dapat terputus. Untuk mengatasi hal ini, dapat dibuat jaringan dengan jalur komunikasi yang dobel, sehingga kalau ada jaringan yang terputus maka dapat menggunakan jalur lain atau jalur cadangan. Mekanisme ini dinamakan routing atau pencarian jalur.
Suatu jaringan secara perlahan-lahan dapat berkembang menjadi besar. Maka akan timbul beberapa permasalahan. Setiap perangkat pada jaringan harus dapat diidentifikasi secara unik. Untuk itu diperlukan suatu mekanisme penomoran atau pengalamatan yang dapat membedakan semua perangkat yang terhubung di jaringan. Sebagai contoh, protokol IP (Internet Protocol) versi 4 dibuat di tahun 1970an. Protkol ini memiliki ruang alamat sebesar 32 bit, jadi dapat membedakan sebanyak 2 pangkat 32 atau sekitar 4 milyar perangkat. Jumlah ini tidak jelas tidak cukup, karena penduduk dunia saja sudah 7 milyar. Jika setiap orang memiliki beberapa perangkat, maka pengalamatan 32 bit tidak cukup. Sebagai solusinya, pada tahun 1998 diperkenalkan protokol IP versi 6 , dengan ruang alamat sebesar 128 bit.
Manusia juga susah mengenali komputer dengan angka. Maka digunakan mekanisme penamaan pada perangkat yang terhubung pada jaringan.
Protokol yang dipakai di jaringan juga berbeda-beda, sehingga perlu ada mekanisme khusus ketika suatu data dilewatkan dari suatu jaringan ke jaringan lain. sebagai contoh, protokol wireless (WiFi) dan kabel ethernet memiliki ukuran maksimum paket yang berbeda. wifi memakai ukuran frame 2346, sedangkan ethernet memakai ukuran frame 1536. Perlu ada mekanisme supaya data ini dapat lewat pada kedua protokol tersebut tanpa terpotong atau hilang.
Scalability maksudnya adalah jaringan mesti dapat tetap berfungsi dengan baik ketika ukurannya membesar, baik dari segi jumlah perangkat yang terhubung, kecepatan jaringan maupun jarak secara fisik.
Jaringan komunikasi memerlukan sumber daya fisik untuk dapat berfungsi. Sumber daya ini terutama adalah kapasitas jalur transmisi. Selain itu juga ada sumber daya pada alat komputasi yang dipakai, meliputi kecepatan CPU, kapasitas memori dan kecepatan input-output. SUmber daya ini harus dipakai bersama dengan baik. jangan sampai ada 1 perangkat yang memonopoli pemakaian sumber daya, sehingga pemakai lain terganggu.
Jaringan dipakai bersama-sama oleh banyak pengguna, dengan besaran pemakaian berubah-ubah, sehingga perlu ada mekanisme untuk membagi alokasi secara dinamis. Pemakaian akan bertambah dan berkurang secara dinamis, jadi sumber daya perlu dialokasikan secara dinamis, tidak dapat dialokasikan secara statik di awal.
perangkat di jaringan juga memiliki kecepatan yang berbeda beda, dari perangkat yang lambat seperti mikrokontroler pada Internet of Things, ada juga yang mencapai kecepatan Gigabit. Perangkat yang lambat hanya dapat menerima data secara lambat, sehingga perlu ada mekanisme pengendalian arus (atau flow control). Perlu ada koordinasi antar perangkat, supaya kecepatan pengiriman disesuaikan dengan kecepatan penerimaan data.
Jalur komunikasi juga dapat memiliki pemakaian melebihi kapasitas, atau dikenal dengan istilah congestion (kongesti). Pada kasus kongesti, jalur komunikasi terlalu padat, sehingga kualitas jaringan menurun, terutama latensi (jeda waktu antara pengiriman dan penerimaan) dan kecepatan transfer data. Salah satu solusinya adalah koordinasi kecepatan pengiriman supaya tidak terjadi kongesti.
beberapa aplikasi memerlukan kualitas jaringan yang bagus, misal jaringan dengan latensi yang terjaga (atau real time delivery). Untuk menjaga kualitas layanan seperti ini diperlukan mekanisme Quality of Service (QoS).
Jaringan komputer juga perlu diamankan. Hal-hal yang perlu dicapai adalah kerahasiaan, keutuhan dan autentikasi.
Kerahasiaan (confidentiality) maksudnya adalah data tidak dapat dibaca oleh pihak yang tidak berhak. Data yang dikirim dikunci dengan suatu password, sehingga hanya pihak yang memiliki password tersebut yang dapat membaca data tersebut.
Integritas (Integrity) maksudnya adalah data tidak dapat diubah. Jika dilakukan perubahan oleh pihak lain, maka kejadian ini dapat dideteksi.
Authentication (autentikasi) maksudnya adalah identitas pengirim data tidak dapat dipalsukan. Identitas pengirim dikodekan ke dalam data yang dikirim dengan kunci khusus yang hanya dimiliki pengirim. Penerima dapat melakukan verifikasi terhadap kode tersebut.
Confluence adalah sebuah aplikasi kolaborasi dalam format wiki yang dibuat oleh Atlassian.
Artikel ini berisi tahap instalasi Confluence versi 7.4.3 di sebuah server Ubuntu 20.04. Confluence menggunakan database sebagai penyimpanan data. Pada instalasi ini, database menggunakan MySQL versi 8.0.21. Pedoman instalasi ini mengadopsi dari pedoman resmi confluence di situs Atlassian: “Installing Confluence on Linux” , dengan penyesuaian seperlunya.

Seperti instalasi Ubuntu pada umumnya, perlu dilakukan update dan upgrade ke versi terbaru. Terutama untuk mengurangi kemungkinan masalah keamanan. Berikut ini perintah yang perlu dijalankan dari console Ubuntu Linux:
|
$ apt update |
Setting database MySQL perlu disesuaikan untuk Confluence.
Tambahkan setting berikut di file /etc/mysql/mysql.conf.d/mysqld.cnf . Untuk mengedit dapat menggunakan editor nano di Ubuntu.
| character-set-server=utf8mb4 collation-server=utf8mb4_bin default-storage-engine=INNODB max_allowed_packet=256M innodb_log_file_size=2GB transaction-isolation=READ-COMMITTED binlog_format=row |
Tahap selanjutnya adalah membuat database serta user untuk mengakses database tersebut. Perlu disiapkan parameter sebagai berikut:
Parameter-parameter tersebut bebas, jadi bisa pilih nama user, nama database dan password sendiri, namun perlu disimpan baik-baik karena akan dipakai di tahap ‘Setup Confluence’ di tahap selanjutnya
Selanjutnya membuat database, dan user di MySQL.
Aktifkan console mysql
| mysql -uroot |
Jalankan perintah SQL berikut ini untuk membuat database dan membuat user baru:
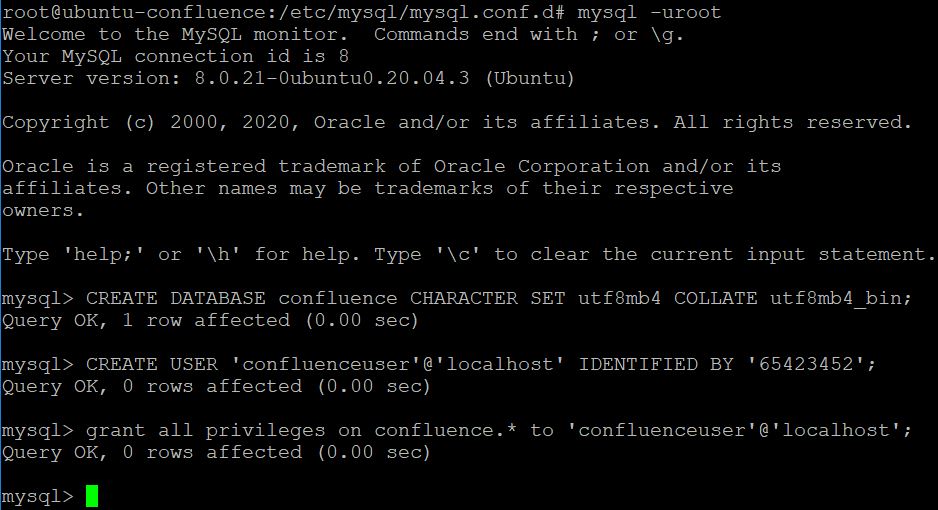
| CREATE DATABASE confluence CHARACTER SET utf8mb4 COLLATE utf8mb4_bin; CREATE USER ‘confluenceuser’@’localhost’ IDENTIFIED BY ‘65423452’; grant all privileges on confluence.* to ‘confluenceuser’@’localhost’; |
Berikut tampilan di console:
Referensi instalasi database MySQL dapat dibaca di situs Atlassian artikel “Database Setup for MySQL“
Download file atlassian-confluence-7.4.3-x64.bin, kemudian letakkan ke sebuah direktori di server.
Pindah ke direktori tersebut
|
$ cd |
Jalankan script instalasi tersebut
| ./atlassian-confluence-7.4.3-x64.bin |
Script instalasi akan melakukan download program-program lain yang diperlukan untuk menjalankan Confluence.
Akan muncul prompt yang menanyakan “This will isntall Confluence 7.4.3 on your computer”. Klik Enter
Kemudian pilih Express Install
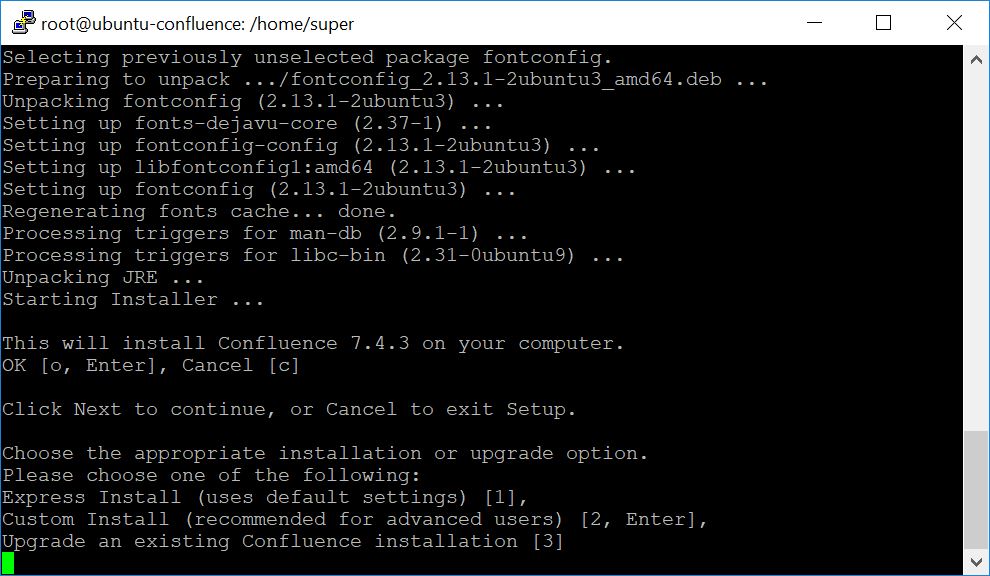
Pilih “1”. Enter
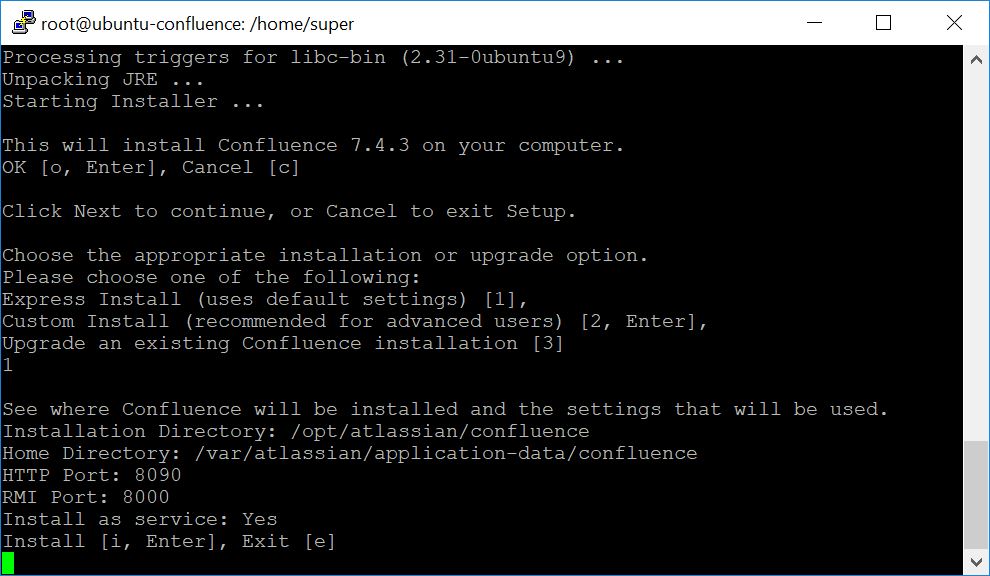
Klik enter untuk menerima setting default.
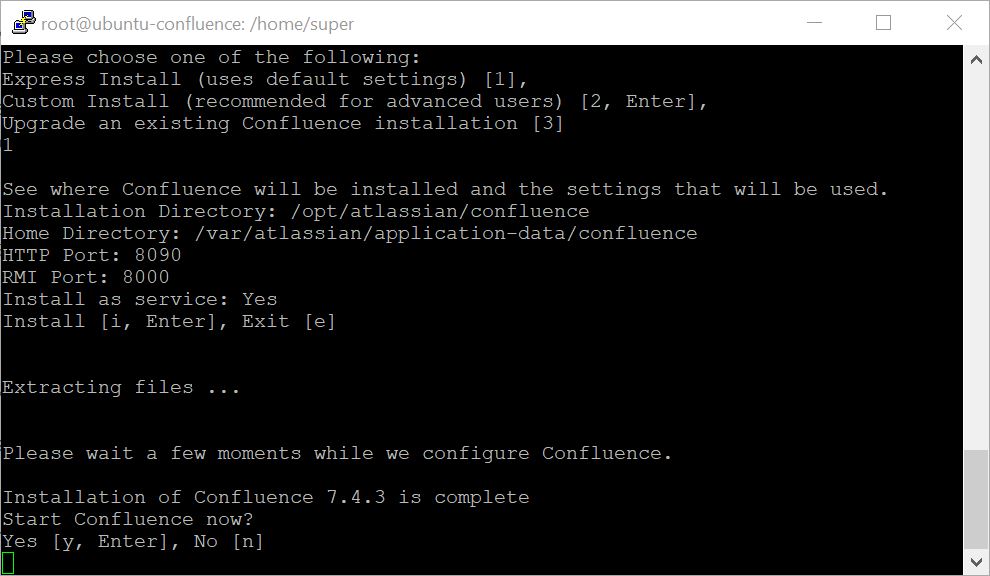
Klik Enter untuk Start Confluence
Instalasi selesai, confluence dapat diakses di alamat http://localhost:8090. Jika ingin diakses dari komputer lain, gunakan http://<alamat server>:8090. Misal pada instalasi ini menggunakan IP 192.168.0.206 , maka gunakan URL http://192.168.0.206:8090
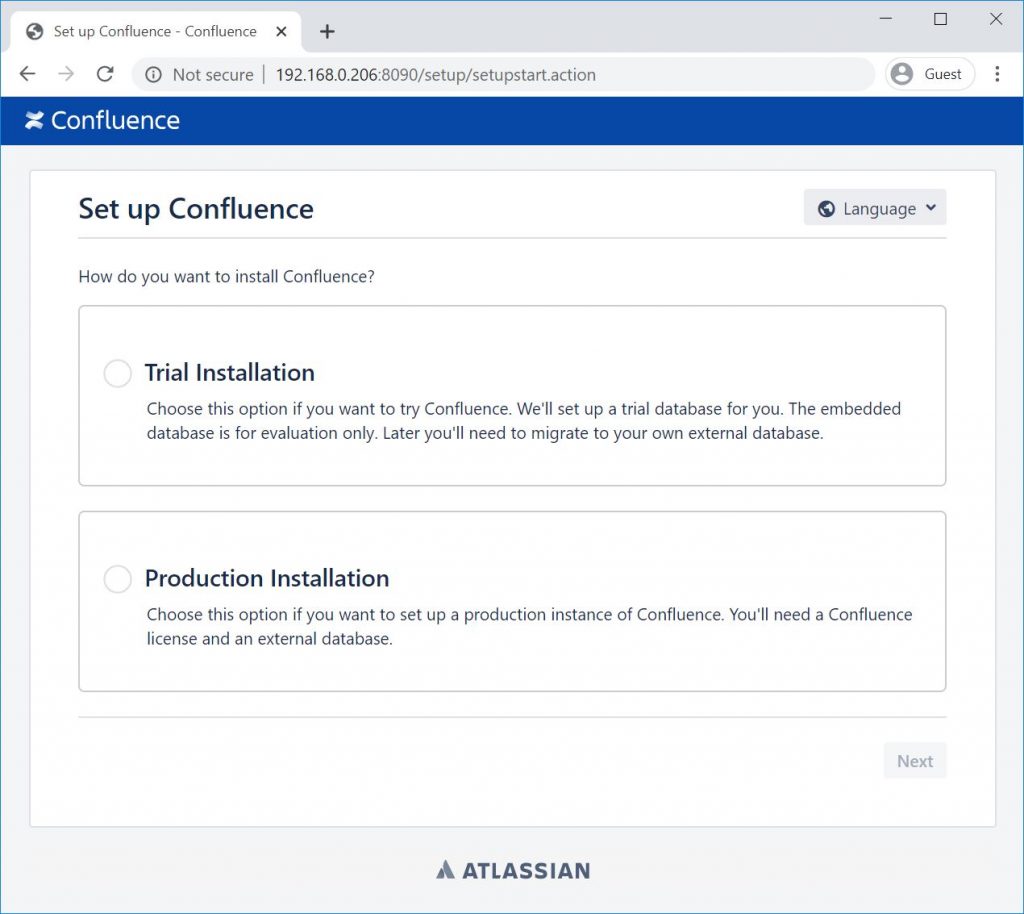
Tahap selanjutnya adalah melakukan set up Confluence dari browser. Ada 2 pilihan: ‘Trial’ dan ‘Production Installation’. Untuk menggunakan database MySQL, pilih ‘Production Installation’. Kemudian klik “Next”.
Muncul tawaran untuk mengaktifkan Confluence Questions dan Team Calendars. Pada saat ini tidak diperlukan, jadi langsung klik “Next”.
Selanjutnya akan muncul formulir “License Key”. Jika belum punya lisensi, klik saja di “Get an evaluation license” untuk mendapatkan trial license. Trial license ini nantinya dapat dengan mudah diganti dengan lisensi sesungguhnya.
Jika belum login, maka akan muncul halaman login di situs Atlassian.
Selanjutnya akan muncul formulir “New Trial License”. Pilih lisensi “Confluence (Server)”, kemudian klik di tombol “Generate License” di bagian bawah formulir tersebut.
Selanjutnya akan muncul konfirmasi untuk melakukan instalasi license key di server kita. Klik saja “Yes”.
Browser akan otomatis mengisikan lisensi trial yang baru saja dibuat ke formulir License key. Klik di “Next”.
Berikutnya akan muncul pilihan database di menu “Set up your database”. Pilih “My own database”.
Pilih MySQL sebagai database. Untuk melanjutkan proses setup, perlu dilakukan instalasi driver MySQL dari console Linux.
Download software Connector J/ 8.0.21 dari situs MySQL: https://dev.mysql.com/downloads/connector/j/8.0.html
Pilih driver untuk “Ubuntu Linux 20.04 (Architecture Independent), DEB Package”, sesuai dengan versi Ubuntu yang dipakai.
Klik di “No thanks, just start my download”
Upload file “mysql-connector-java_8.0.21-1ubuntu20.04_all.deb” ke server.
install dengan apt install
| apt install ./mysql-connector-java_8.0.21-1ubuntu20.04_all.deb |
Setelah proses instalasi, file driver JDBC akan tersedia di direktori /usr/share/java
root@ubuntu-confluence:~# ls -l /usr/share/java |
Copy file jar tersebut ke direktori library confluence <installation-directory>/confluence/WEB-INF/lib
Pada proses instalasi default, direktori library Confluence adalah di /opt/atlassian/confluence/confluence/WEB-INF/lib/
Copy driver JDBC ke direktori library Confluence tersebut.
cp /usr/share/java/mysql-connector-java-8.0.21.jar /opt/atlassian/confluence/confluence/WEB-INF/lib/ |
Selanjutnya restart Confluence dengan perintah berikut ini
$ sh /opt/atlassian/confluence/bin/stop-confluence.sh |
Akses kembali Confluence dari web browser dengan alamat sebelumnya , misal http://192.168.0.206:8090/. Pilih “My own database” kemudian klik “Next”.
Isikan ke formulir sebagai berikut:
Klik di “Test connection”. Jika semuanya benar, maka akan muncul pesan “Success! Database connected successfully”. Jika ada kesalahan, akan ditampilkan kode kesalahannya.
Selanjutnya “klik Next”. Proses instalasi akan melakukan set up database, yaitu mengisi database dengan data-data aplikasi Confluence.
Selanjutnya akan muncul pilihan untuk mengisi Confluence dengan data demo . Pada tahap ini bebas saja, jika ingin melihat kemampuan Confluence bisa klik di “Example Site”, jika tidak ingin bisa klik di “Empty Site”.
Selanjutnya ada pilihan untuk manajemen user. Jika tidak ingin install JIRA, untuk mudahnya, pilih saja “Manage users and groups within Confluence”
Selanjutnya muncul formulir pengisian identitas administrator
Selanjutnya akan muncul pesan yang menyatakan proses Setup selesai.
Pada tahap ini instalasi dan setup Confluence sudah selesai. Aplikasi dapat diakses di port 8090, dengan URL seperti ini: http://192.168.0.206:8090
Software Confluence yang baru diinstall ini menggunakan lisensi trial, yang hanya berlaku selama 30 hari. Setelah itu kita perlu membeli lisensi resmi.
Untuk dapat diakses di port 80, dapat menggunakan web server Apache dengan fitur reverse proxy. Untuk dapat lebih aman, perlu ditambahkan enkripsi data dengan SSL (Security Socket Layer)
Fungsi utama rangka manusia secara ringkas adalah sebagai berikut:
Berikut ini ilustrasi rangka manusia [sumber]
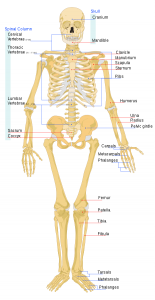
Rangka manusia memungkinkan manusia untuk berdiri tegak dan menjaga bentuk tubuh manusia.
Sendi-sendi antar tulang memungkinkan pergerakan. Sendi ada yang dapat bergerak sedikit, ada yang dapat bergerak cukup banyak. Beberapa sendi memiliki keleluasaan gerak lebih dari sendi lain.
Secara mekanik, rangka berfungsi sebagai tuas-tuas. sedangkan sendi sebagai engsel. Gerakan dilakukan oleh otot-otot yang menarik rangka tersebut.
Tulang melindungi beberapa organ vital yang lunak dari kerusakan akibat benturan.
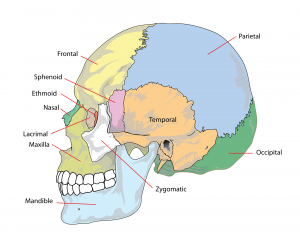
Berikut ini gambar tulang tengkorak manusia. Di dalamnya terlindung otak manusia.
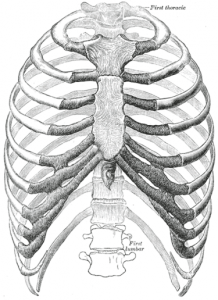
Berikut ini gambar tulang rusuk manusia [sumber]. Di dalamnya terdapat paru-paru dan jantung yang terlindung dengan baik.
Bagian dalam rangka/tulang berisi sumsum tulang yang menjadi tempat produksi sel darah.
Pembuatan sel darah ini disebut juga sebagai hemopoesis atau hematopoiesis . Sel darah yang dibuat ini adalah sel darah merah, sel darah putih dan keping darah.
Struktur rangka menyimpan kalsium dan terlibat dalam metabolisme kalsium pada tubuh. Sumsum darah menyimpan zat besi dan terlibat dalam metabolisme besi.
Rangka tidak semuanya tersusun dari kalsium, namun merupakan campuran dari chondroitin sulfate dan hydroxyapatite.
Sel tulang melepaskan hormon osteocalcin, yang melakukan regulasi kadar gula (glukosa) dan penumpukan lemak.
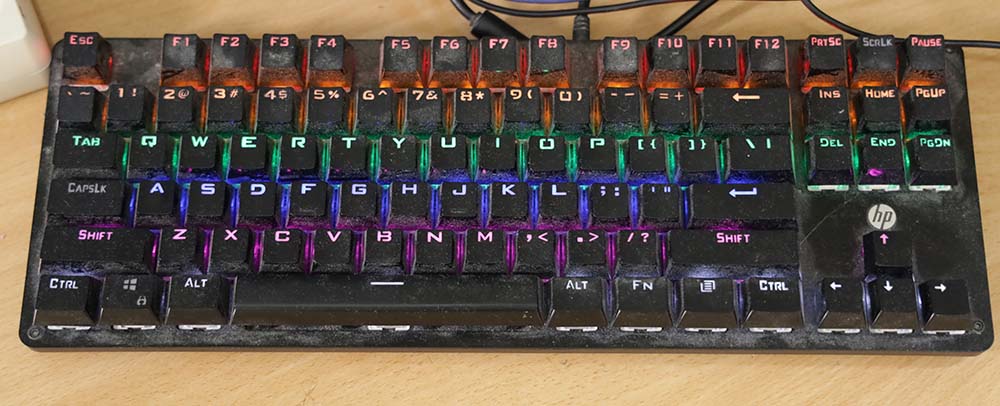
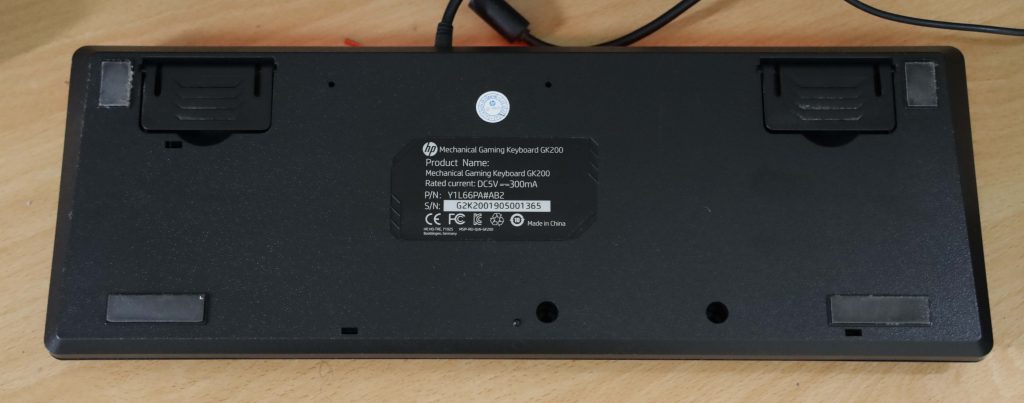
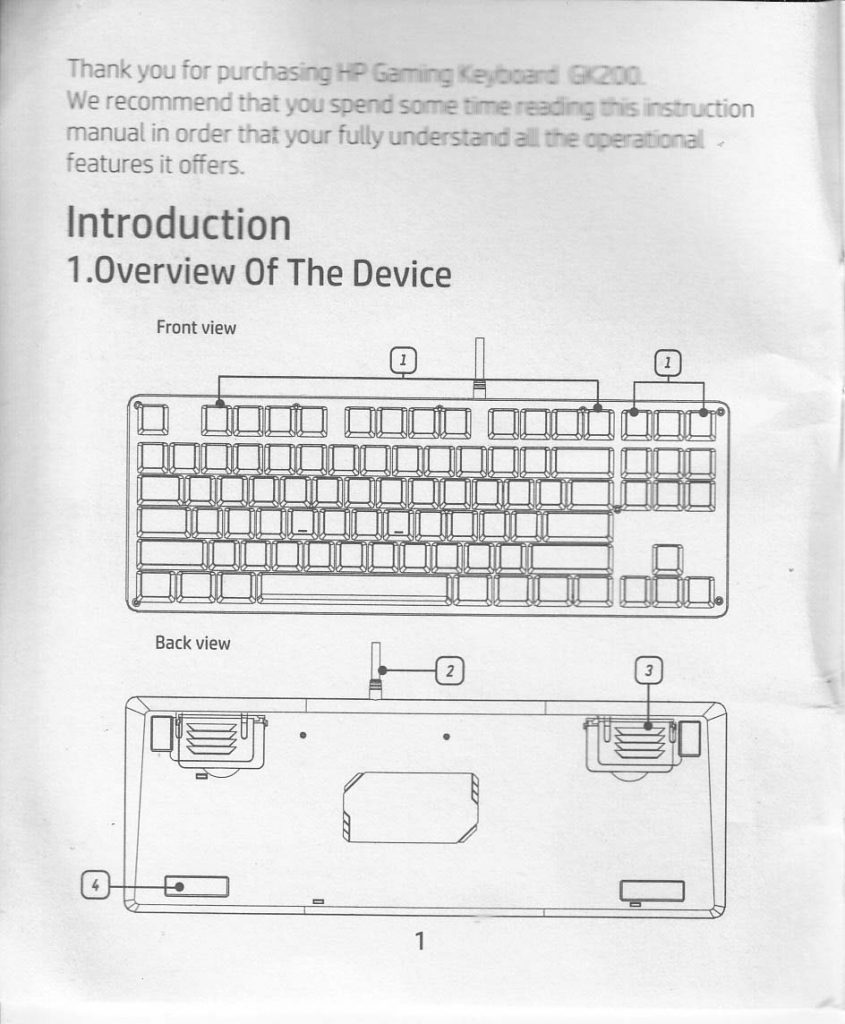
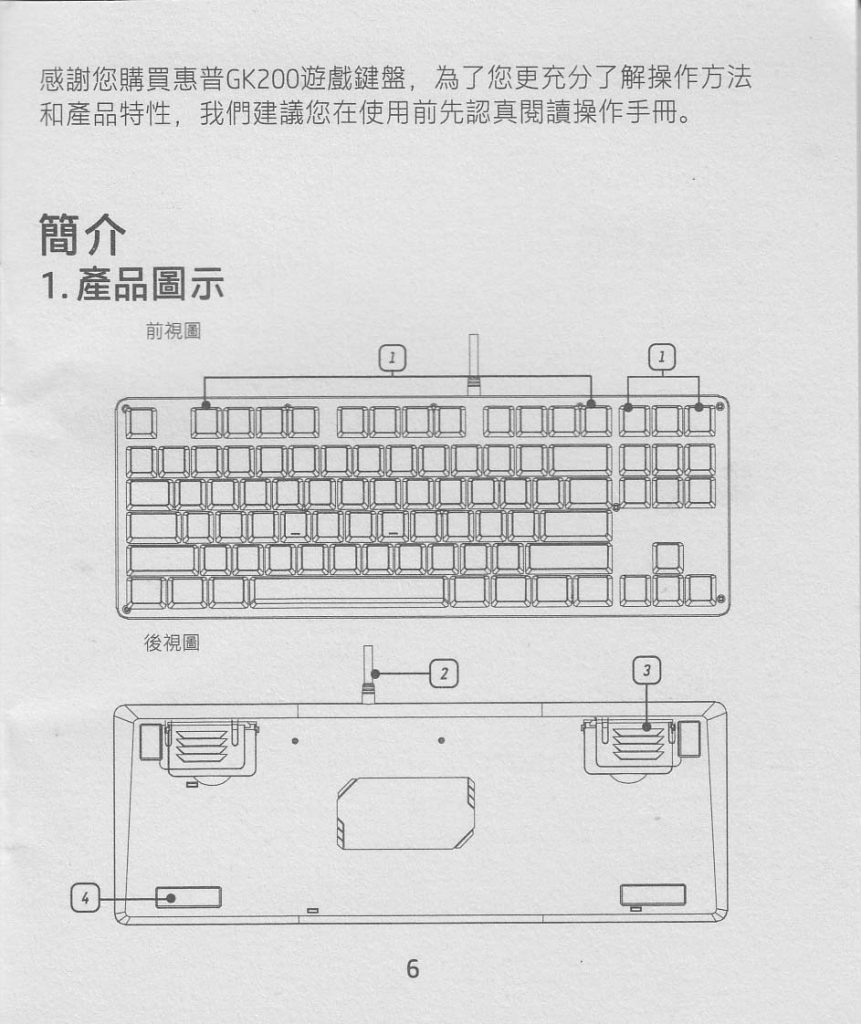
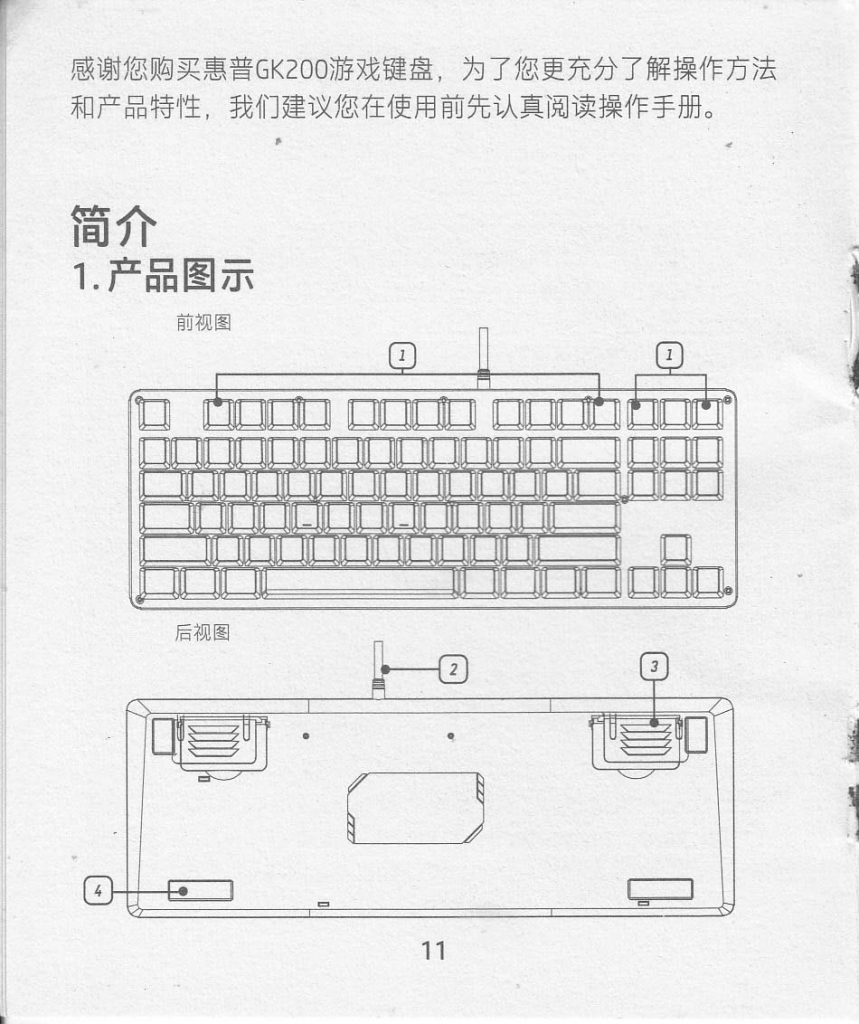
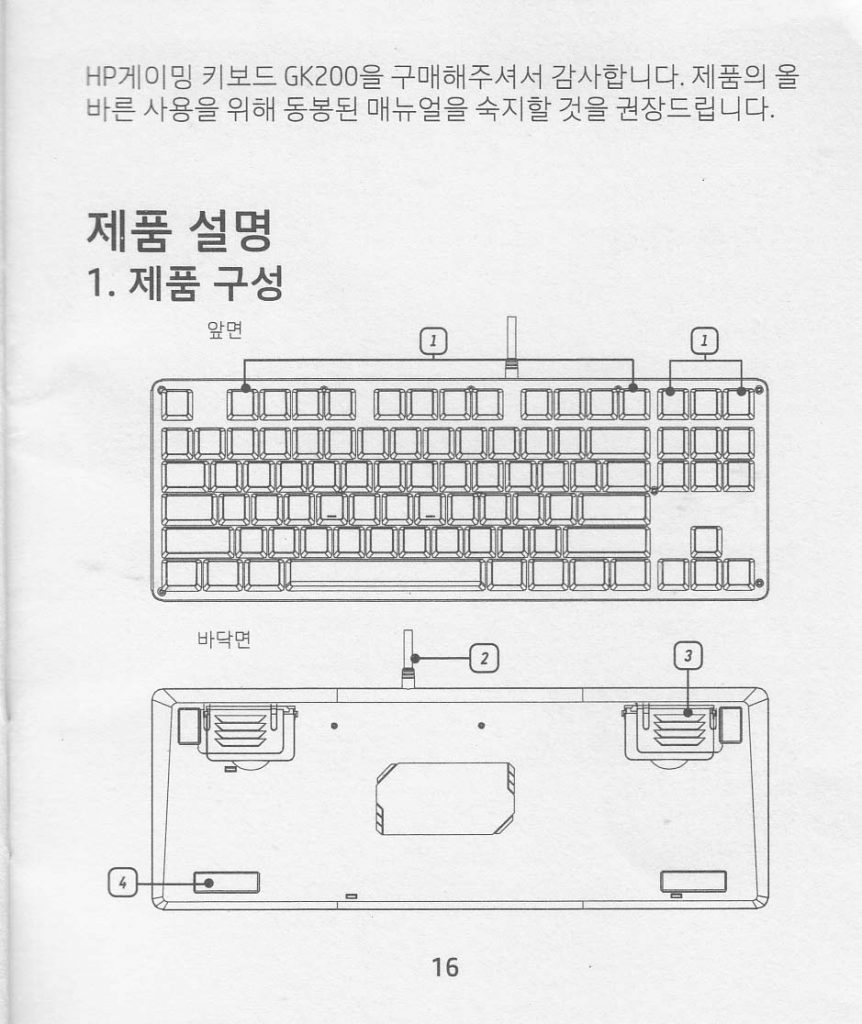
Berikut ini manual dan foto-foto keyboard gaming HP GK200. Keyboard ini ‘mestinya’ buatan HP (Hewlett Packard) . Cuma anehnya kalau dicari di situs HP (www.hp.com), keyboard ini susah dicari.
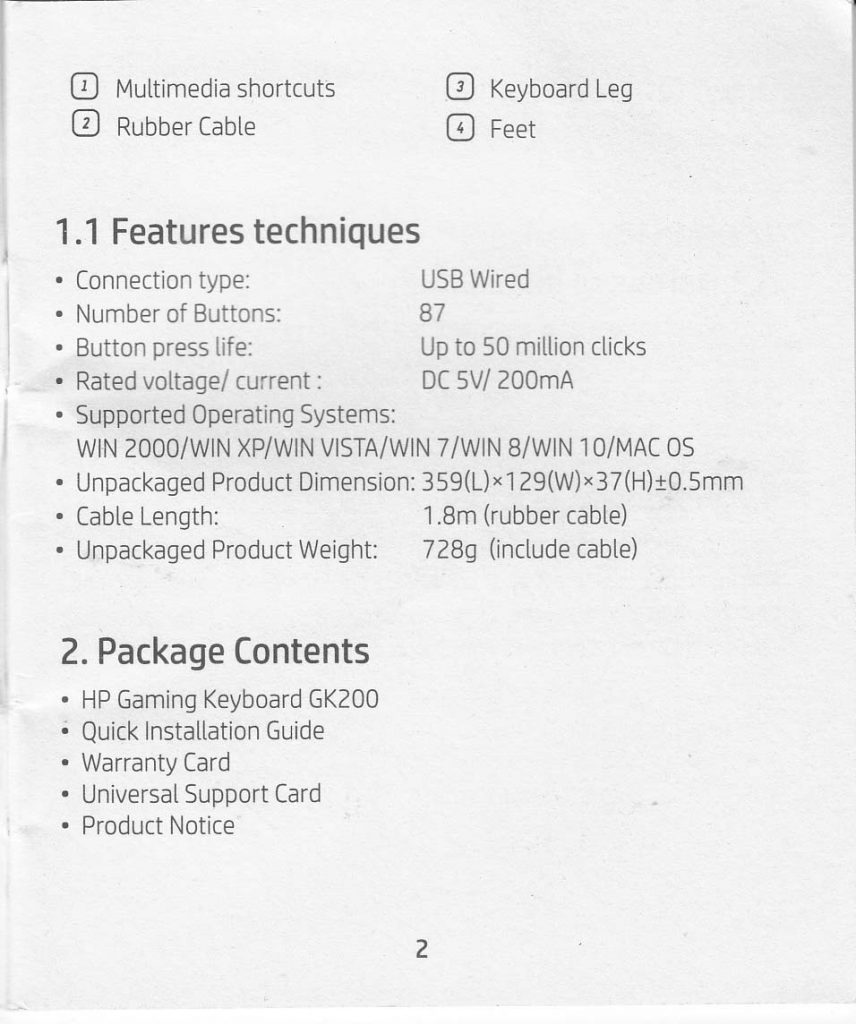
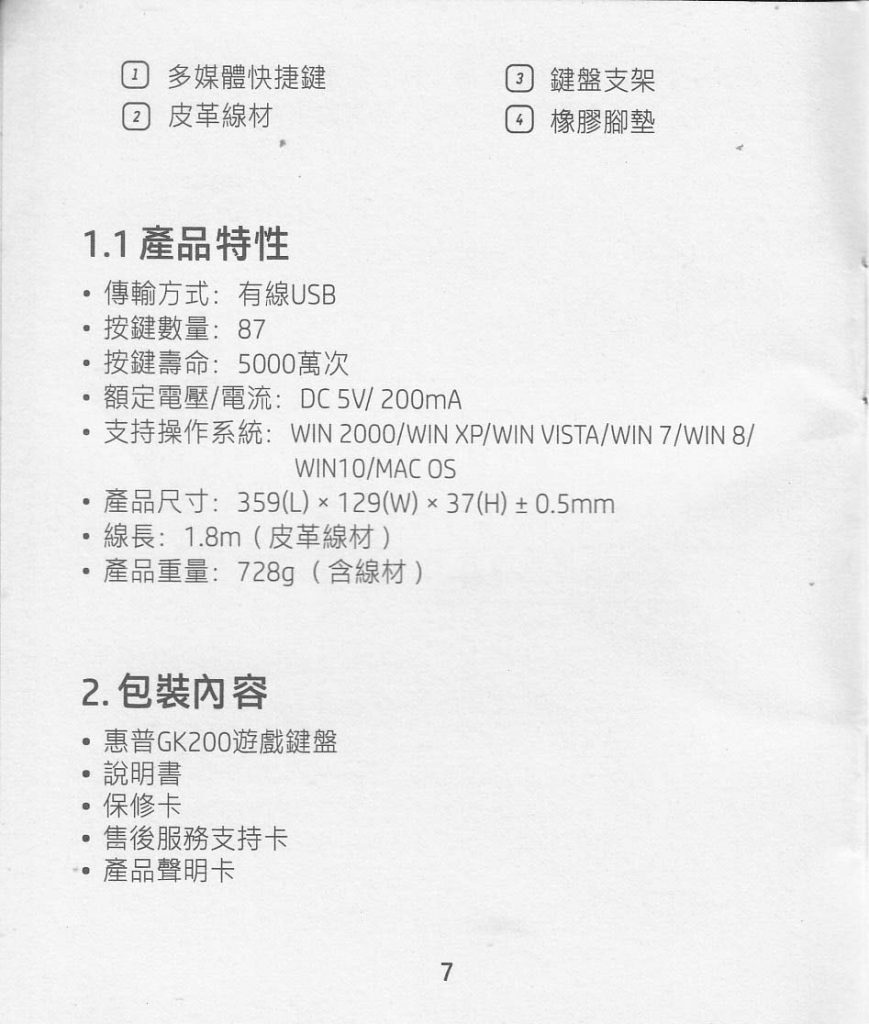
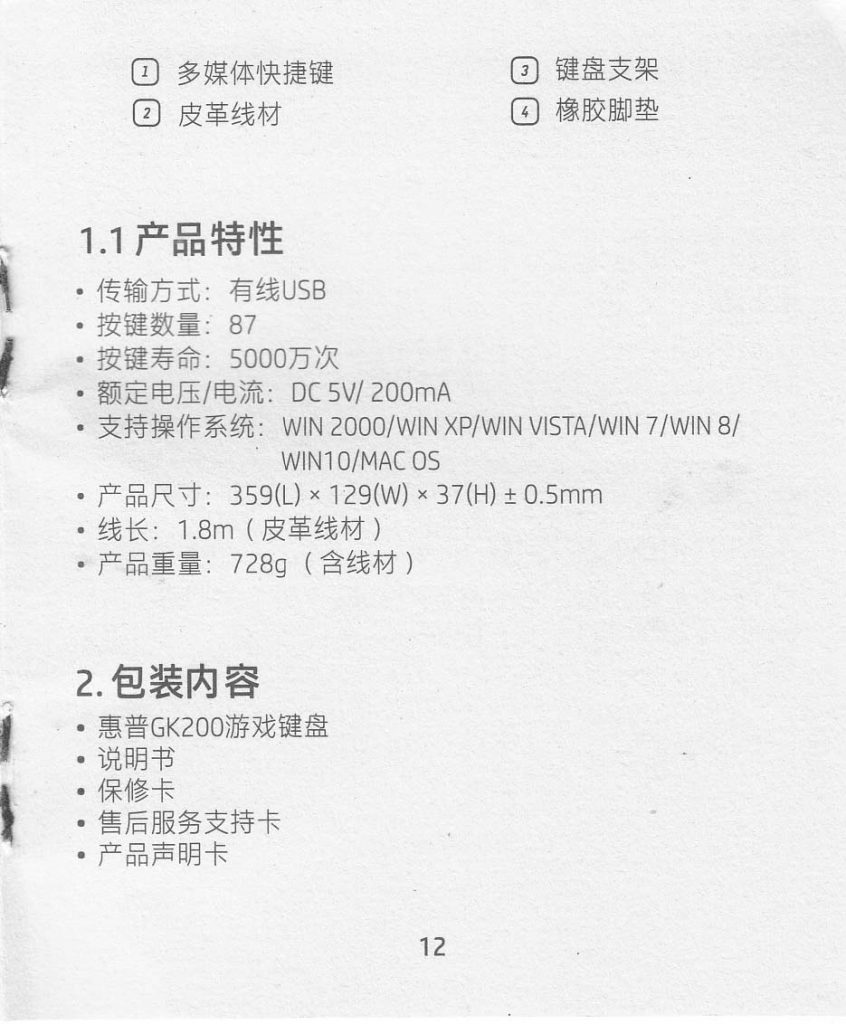
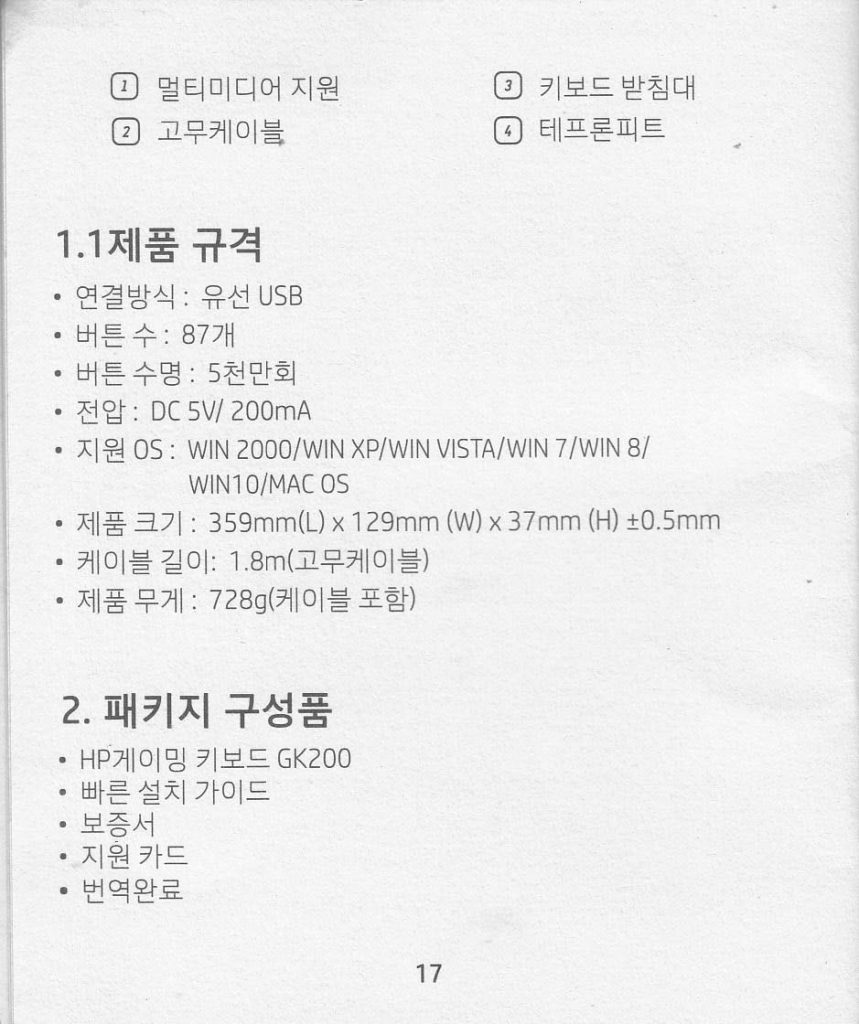
1.1 Features techniques
Connection type: USB Wired
Number of Buttons: 87
Button press life: up to 50 million clicks
Rated voltage/current: DC 5V/200mA
Supported Operating Systems: WIN2000/ WIN XP/WIN VISTA/WIN 7/Win 8/WIn 10/MAC OS
Unpackaged Product Dimension: 359(L) x 129 (W) x 37 (H) +- 0.5 mm
Cable Length: 1.8 m (rubber cable)
Unpackaged Product Weight : 728 g (include cable)
2. Package Contents
HP Gaming Keyboard GK200
Quick Installation Guide
Warranty Card
Universal Support Card
Product Noticew
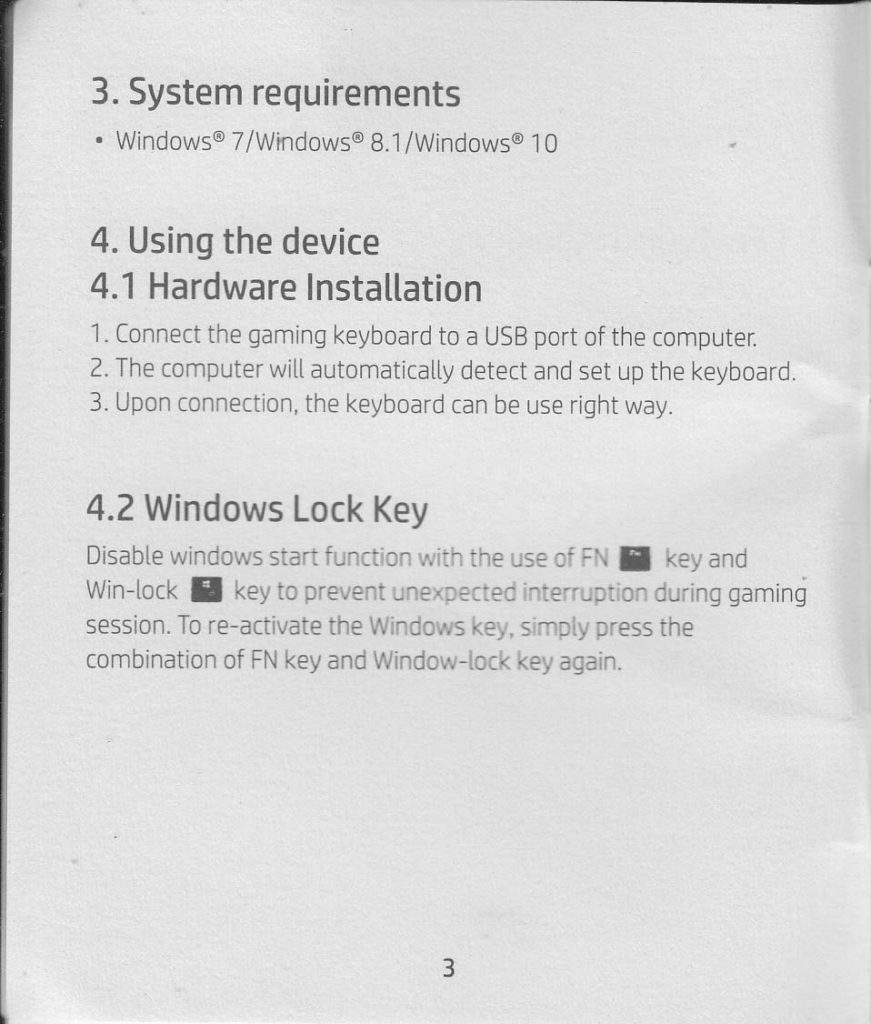
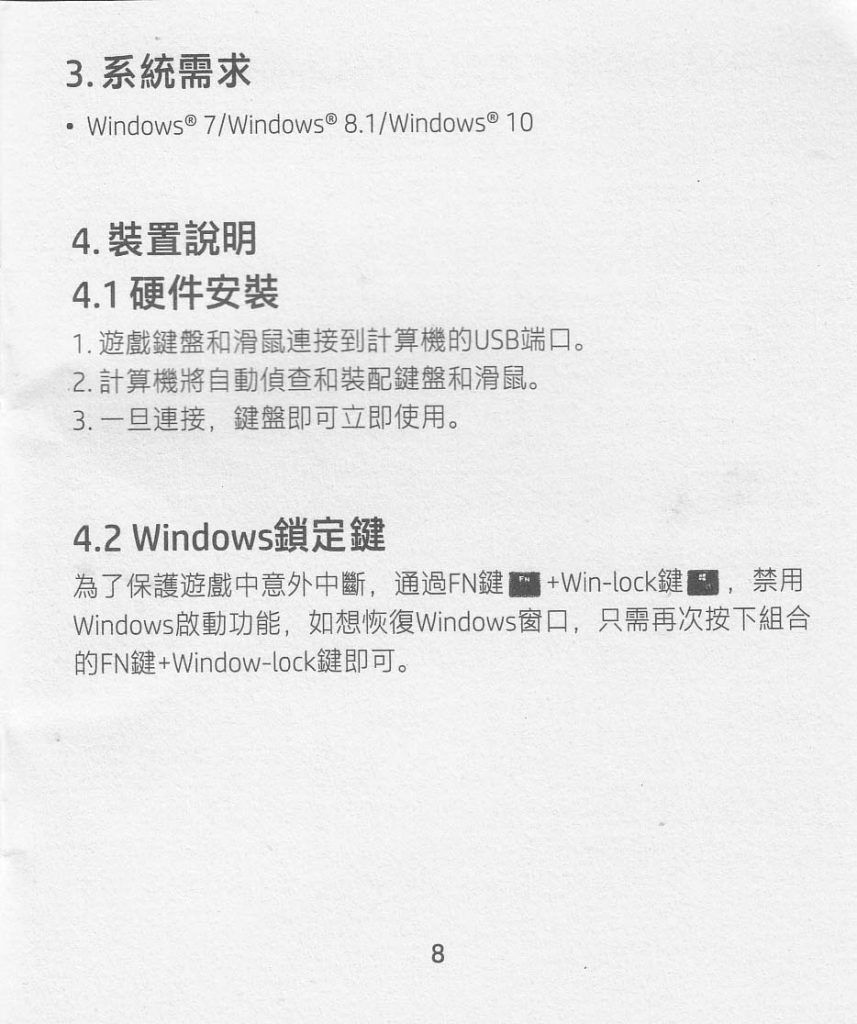
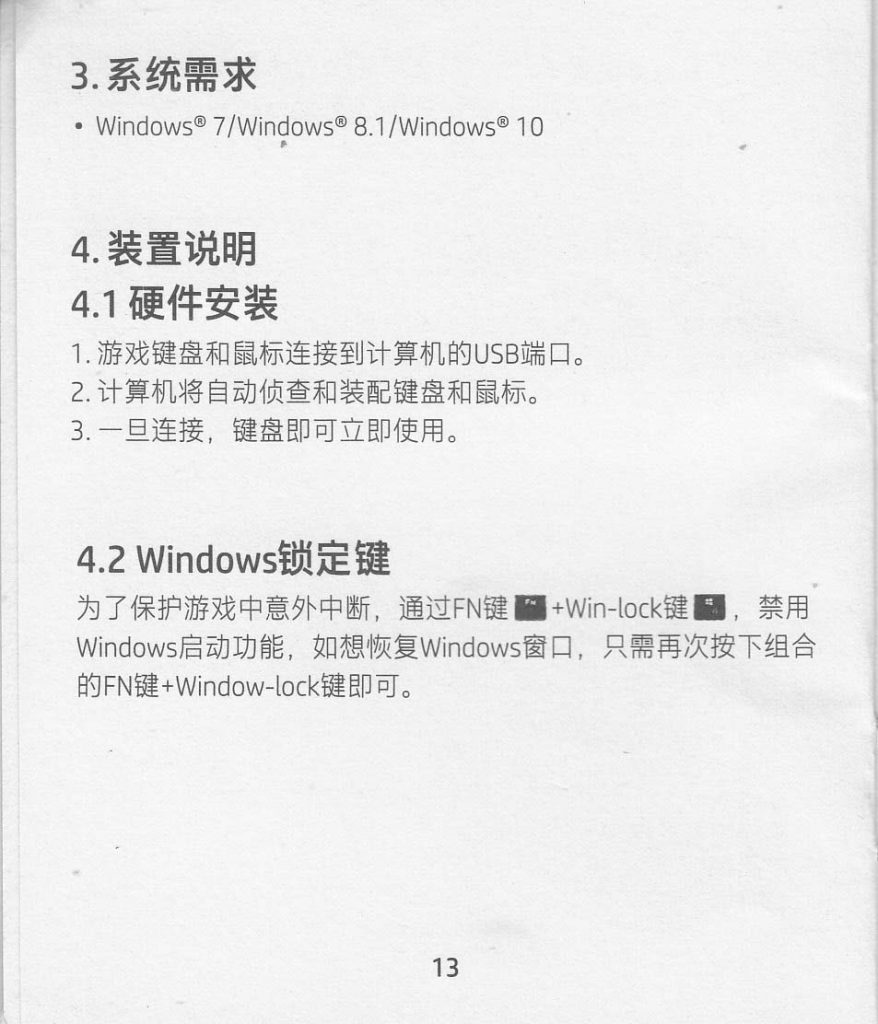
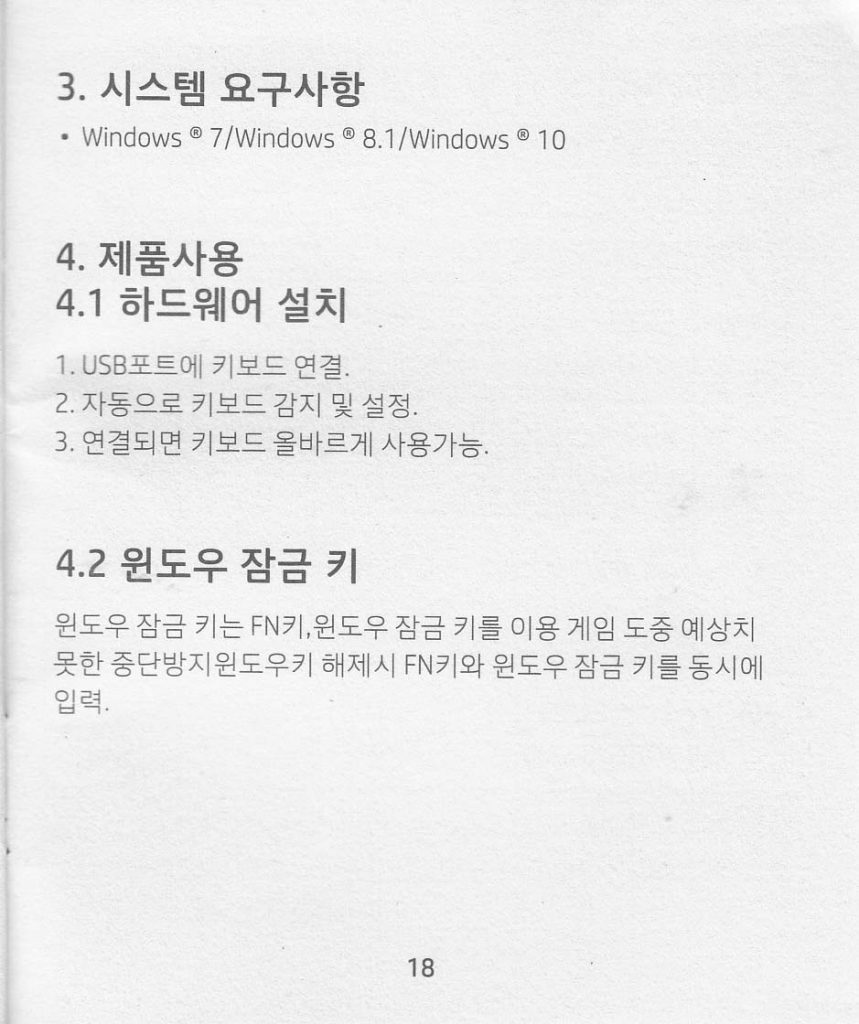
3. System requirement
Windows 7/Windows 8.1 / Windows 10
4. Using the device
4.1 Hardware Installation
1. Connect the gaming keyboard to a USB port of the computer
2. The computer will automatically detect and set up the keyboard
3. Upon connection, the keyboard can be use right away.
4.2 Windows Lock Key
Disable windows start function with the use of FN key and Win-lock key to prevent unexpected interruption during gaming session. To re-activate the Windows key, simply press the combination of FN key and Window-lock key again.
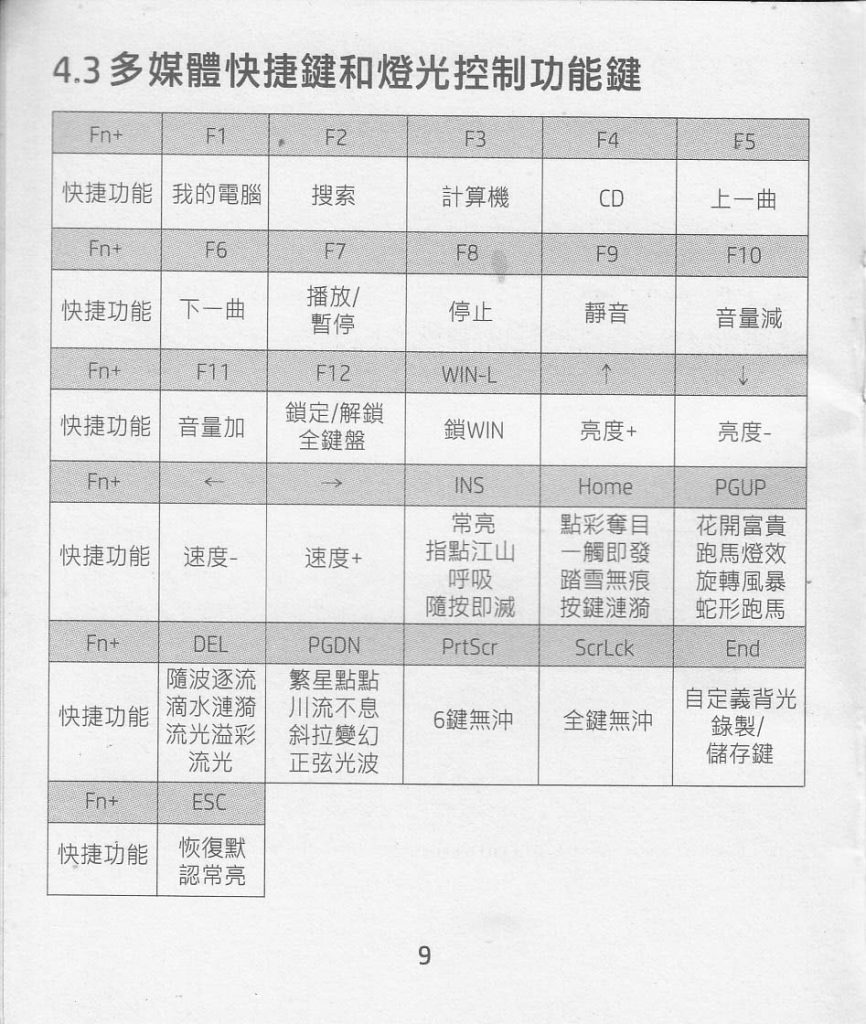
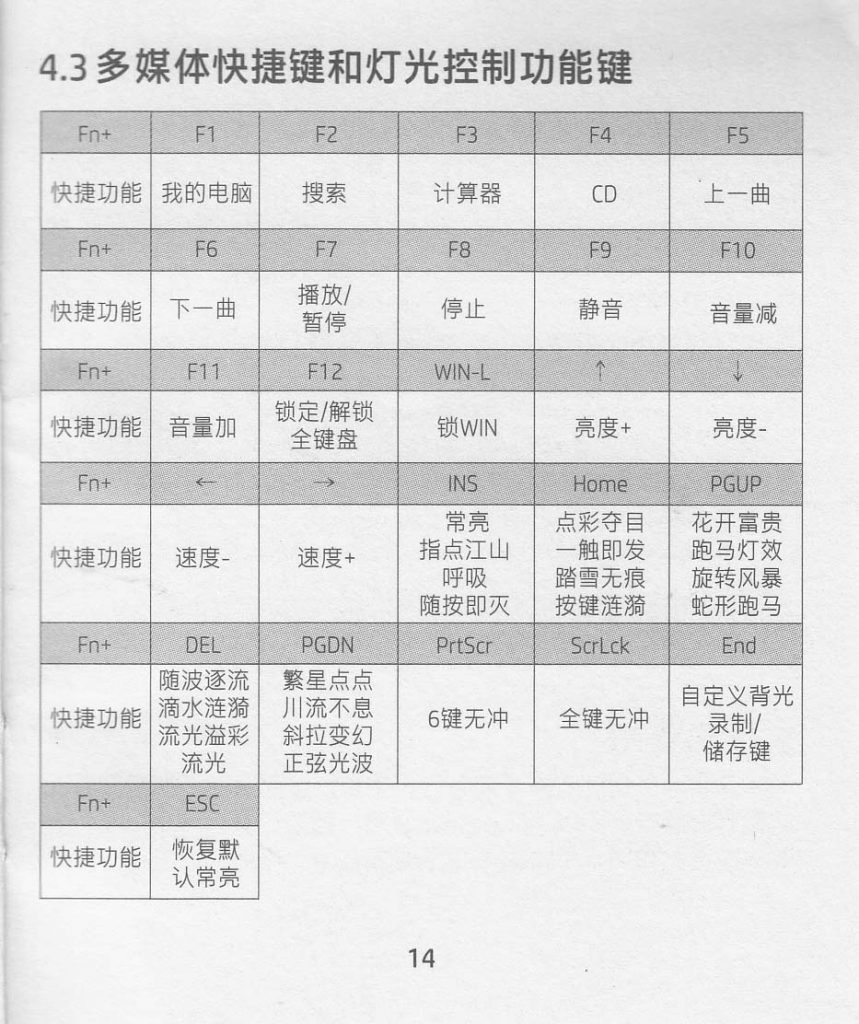
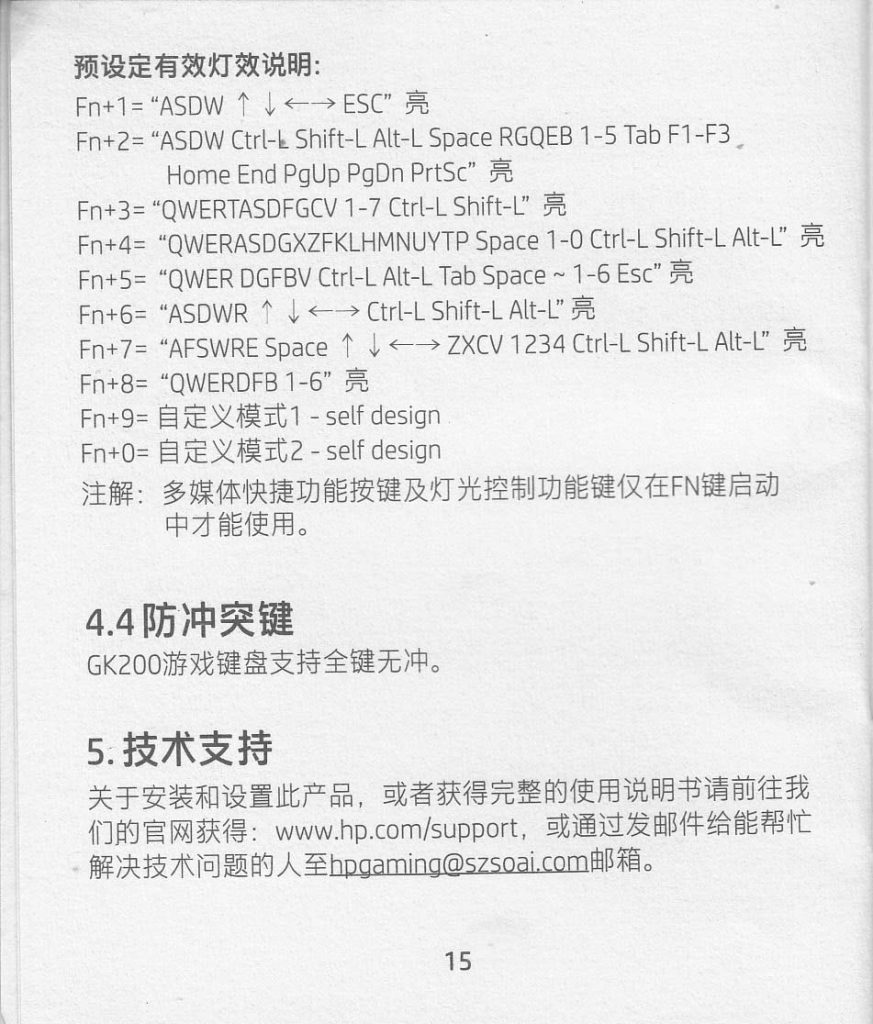
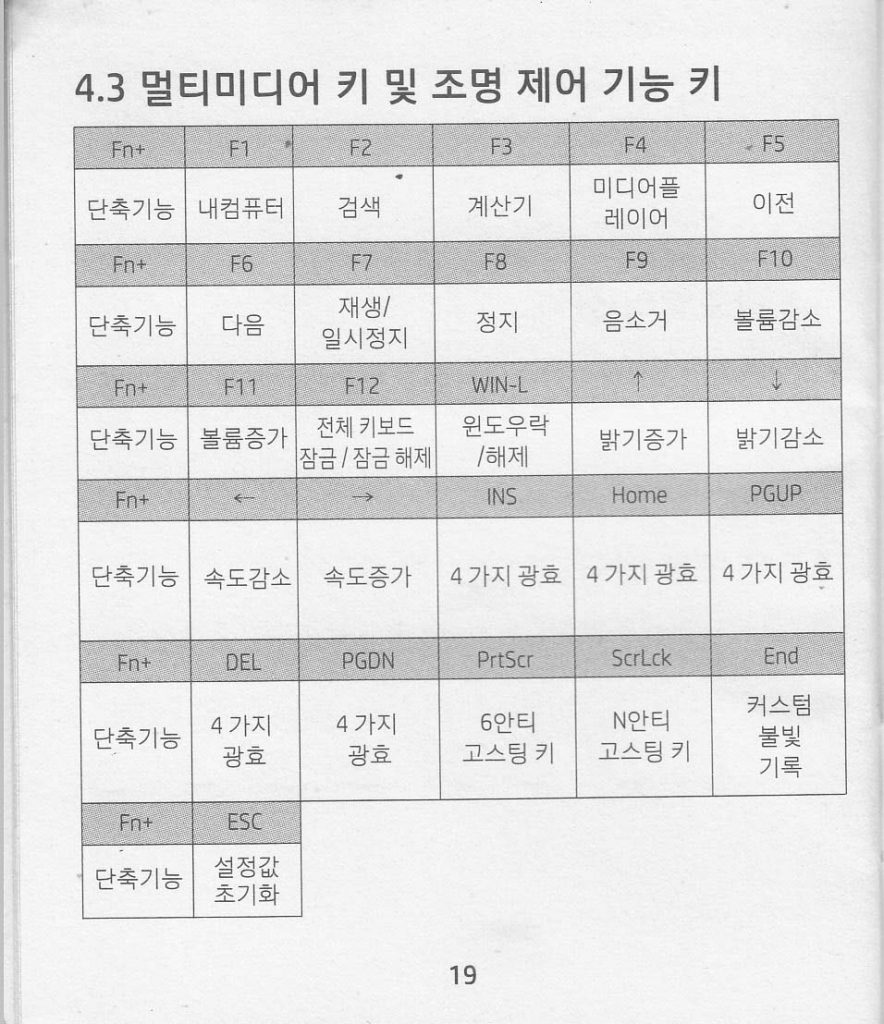
![Fn+F1: My Computer Fn+F2: Search Fn+F3: Calculator Fn+F4: Media player Fn+F5: previous Fn+F6: next Fn+F7: play/pause Fn+F8: stop Fn+F9: mute Fn+F10: decrease volume Fn+F11: increase volume Fn+F12: full keyboard lock/unlock Fn+WIN-L: win lock/unlock Fn+[up key]: increase brightness Fn+[down key]: decrease brightness Fn+[left arrow]: decrease speed Fn+[right arrow]: increase speed Fn+[INS]: decrease speed Fn+[Home]: switch between 4 idfferent light effect Fn+[PGUP]: switch between 4 idfferent light effect Fn+[DEL]: switch between 4 idfferent light effect Fn+[PGDN]: switch between 4 different lifht effect Fn+[PrtScr]: 6 anti ghosting keys Fn+[ScrLck]: N anti ghosting keys Fn+[End]: custom backlight recording Fn+[Esc]: back to record](https://iptek.web.id/wp-content/uploads/2020/07/page-04-858x1024.jpg)
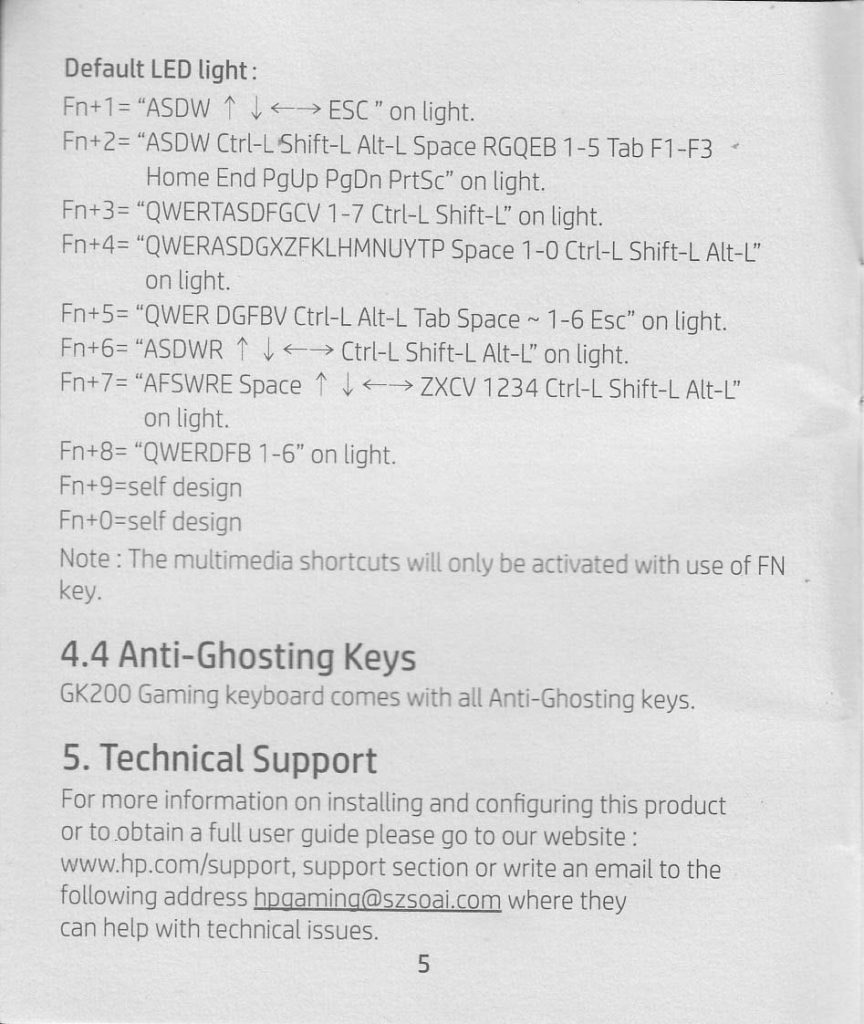
Fn+F1: My Computer
Fn+F2: Search
Fn+F3: Calculator
Fn+F4: Media player
Fn+F5: previous
Fn+F6: next
Fn+F7: play/pause
Fn+F8: stop
Fn+F9: mute
Fn+F10: decrease volume
Fn+F11: increase volume
Fn+F12: full keyboard lock/unlock
Fn+WIN-L: win lock/unlock
Fn+[up key]: increase brightness
Fn+[down key]: decrease brightness
Fn+[left arrow]: decrease speed
Fn+[right arrow]: increase speed
Fn+[INS]: decrease speed
Fn+[Home]: switch between 4 idfferent light effect
Fn+[PGUP]: switch between 4 idfferent light effect
Fn+[DEL]: switch between 4 idfferent light effect
Fn+[PGDN]: switch between 4 different lifht effect
Fn+[PrtScr]: 6 anti ghosting keys
Fn+[ScrLck]: N anti ghosting keys
Fn+[End]: custom backlight recording
Fn+[Esc]: back to record
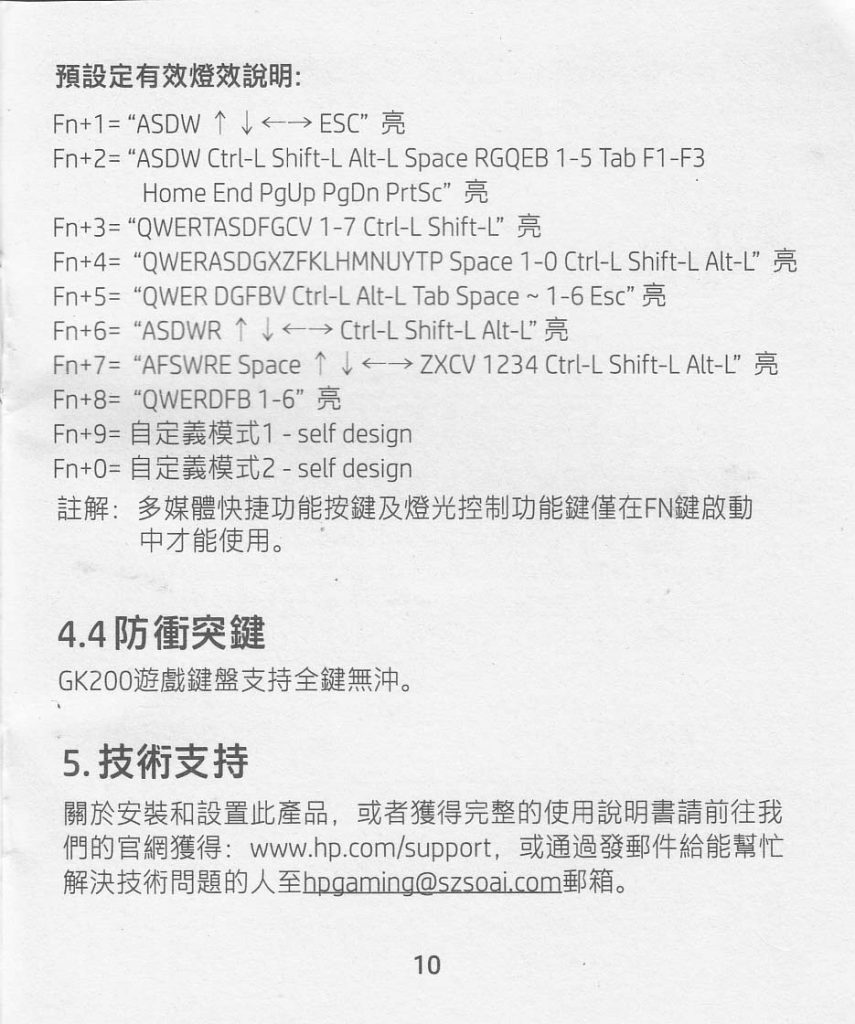
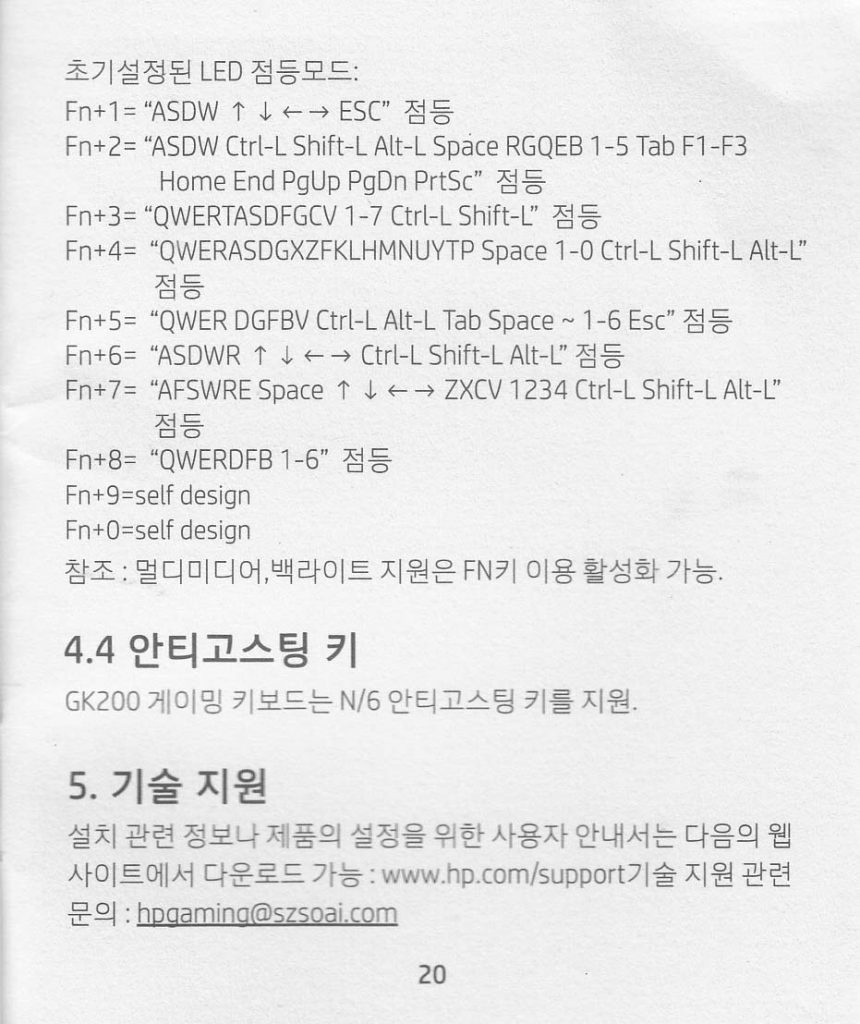
4.4 Anti Ghosting Keys
GK200 Gaming keyboard comes with all anti-ghosting keys
5. Technical Support
For more information on installing and configuring this product or to obtain a full user guide please go to our website www.hp.com/support, support section or write an email to the following address [email protected] where they can help with technical issues.


Use & Care Manual
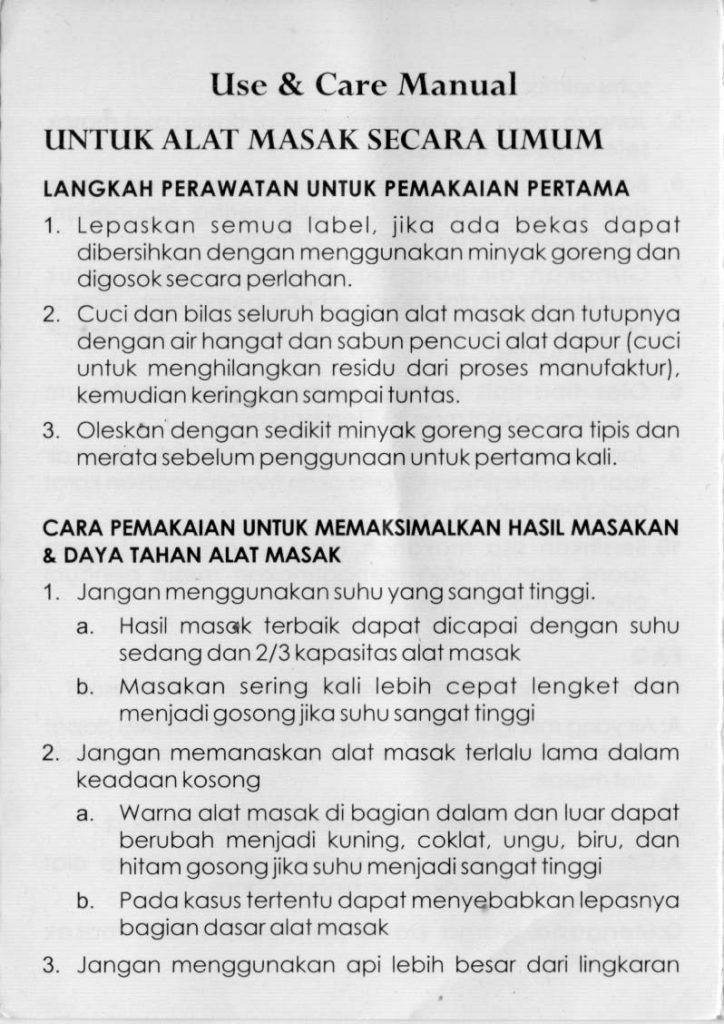
UNTUK ALAT MASAK SECARA UMUM
Langkah Perawatan Untuk Pemakaian Pertama
1. Lepaskan semua label, jika ada bekas dapat dibersihkan dengan menggunakan minyak goreng dan digosok secara perlahan
2. Cuci dan bilas seluruh bagian alat masak dan tutupnya dengan air hangat dan sabun pencuci alat dapur (cuci untuk menghilangkan residu dari proses manufaktur), kemudian keringkan sampai tuntas.
3. Oleskan dengan sedikit minyak goreng secara tipis dan merata sebelum penggunaan untuk pertama kali.
Cara Pemakaian Untuk Memaksimalkan Hasil Masakan & Daya Tahan Alat Masakan
1. Jangan menggunakan suhu yang sangat tingi.
a. Hasil masak terbaik dapat dicapai dengan suhu sedang dan 2/3 kapasitas alat masak.
b. Masakan sering kali lebih cepat lengket dan menjadi gosong jika suhu sangat tinggi.
2. Jangan memanaskan alat masak terlalu lama dalam keadaan kosong
a. Warna alat masak di bagian dalam dan luar dapat berubah menjadi kuning, coklat, ungu, biru dan hitam gosong jika suhu menjadi sangat tinggi.
b. Pada kasus tertentu dapat menyebabkan lepasnya bagian dasar alat masak.
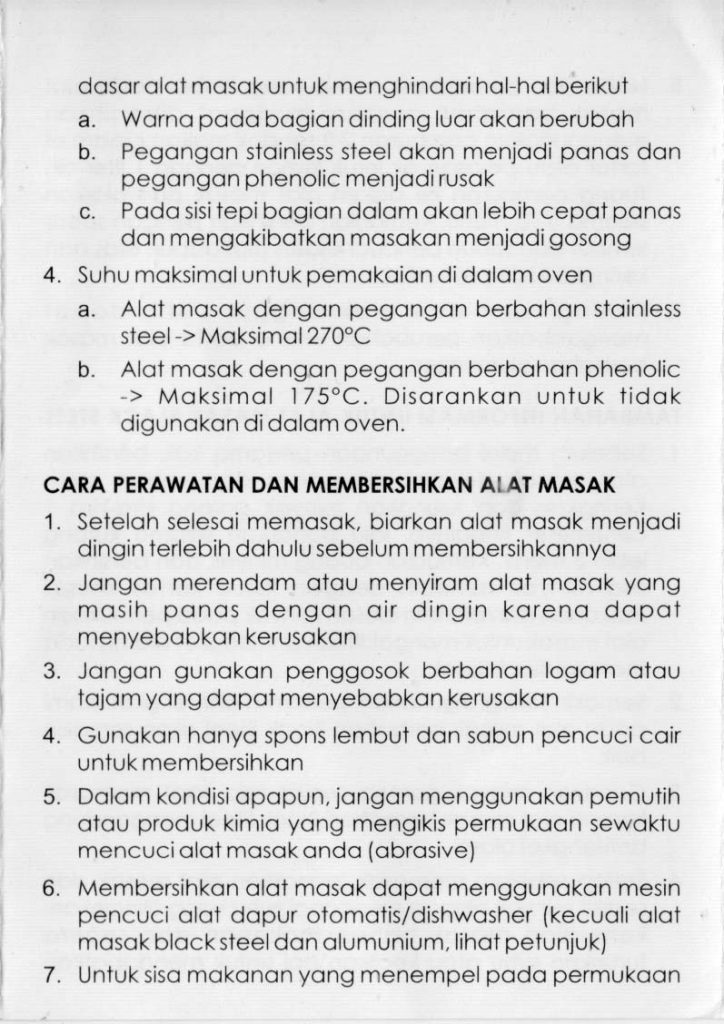
3. Jangan menggunakan api lebih besar dari lingkaran dasar alat masak untuk menghindari hal-hal berikut
a. Warna pada bagian dinding luar akan berubah
b. Pegangan stainless steel akan menjadi panas dan pegangan phonelic menjadi rusak
c. Pada sisi tepi bagian dalam akan lebih cepat panas dan mengakibatkan masakan menjadi gosong
4. Suhu maksimal untuk pemakaian di dalam oven
a. Alat masak dengan pegangan berbahan stainless steel -> Maksimal 270 derajat Celcius
b. Alat masak dengan pegangan berbahan phonelic -> Maksimal 175 derajat Celcius. Disarankan untuk tidak digunakan di dalam oven.
Cara Perawatan dan Membersihkan Alat Masakan
1. Setelah selesai memasak, biarkan alat masak menjadi dingin terlebih dahulu sebelum membersihkannya
2. Jangan merendam atau menyiram alat masak yang masih panas dengan air dingin karena dapat menyebabkan kerusakan.
3. Jangan gunakan penggoson berbahan logam atau tajam yang dapat menyebabkan kerusakan.
4. Gunakan hanya spons lembut dan sabun pencuci cair untuk membersihkannya
5. Dalam kondisi apapun, jangan menggunakan pemutih atau produk kimia yang mengikis permukaan sewaktu mencuci alat masak anda (abrasive)
6. Membersihkan alat masak dapat menggunakan mesin pencuci alat dapur otomatis / dishwasher (kecuali alat masak black steel dan alumuinium, lihat petunjuk).
7. Untuk sisa makanan yang menempel pada permukaan alat masak dan sulit dibersihkan, tuang air bersih dicampur cuka putih dengan perbandingan air:cuka putih = 9:1. Didihkan sambil bersihkan dengan sepatula kayu. Buang campuran air dan cuka putih, kemudian cuci seperti biasa sesuai petunjuk.
8. Setelah mencuci, selalu keringkan sampai tuntas karena sisa air yang tertinggal dapat menimbulkan noda oksidasi pada permukaan alat masak.
Hal Yang Harus Diperhatikan Untuk Keamanan Pemakaian
1. Jangan memasak dengan suhu yang tinggi tanpa diawasi
2. Jangan menggunakan alat masak yang memiliki bagian material kayu di dalam oven
3. Gunakan alat masak sesuai fungsinya
4. Jauhkan alat masak panas dari jangkauan anak-anak.
5. Disarankan agar selalu memakai sarung tangan dapur untuk memegang alat masak pada saat memasak
Tambahan Informasi untuk Alat Masak Dengan Lapisan Non-Stick
1. Pada prinsipnya semua alat masak dengan lapisan non-stick mempunyai masa pakai. Masa pakai sangat tergantugn dengan cara pemakaian dan perawatan.
2. Jangan menggunakan peralatan masak yang tajam atau terbuat dari logam karena akan menggores lapisan non-stick
3. Peralatan untuk memasak menggunakan alat masak non-stick sebaiknya terbuat dari kayu, silicone, nylon atau polycarbonate
4. Suhu maksimal adalah 260 derajat celcius untuk pemakaian di dalam oven
5. Gunakan suhu sedang atau sedang cenderung rendah untuk janga pemakaian alat masak lebih lama
6. Perhatikan dengan baik penempatan alat masak dengan lapisan anti lengket di dalam mesin pencuci untuk menghindari gesekan atau benturan yang menyebabkan kerusakan dan pengelupasan pada permukaan alat masak
Tambahan Informasi Untuk Alat Masak Aluminium
1. Garam yang tidak dilarutkan akan mengakibatkan korosi dan kerusakan permukaan pada alat masak berbahan aluminium. Sebaiknya garam ditambahkan setelah makanan mendidih dan segera diaduk hingga larut.
2. Makanan yang mengandung kadar asam tinggi dan kadar garam tinggi sebaiknya tidak didiamkan terlalu lama di dalam alat masak berbahan aluminium karena menyebabkan korosi dan kerusakan pada permukaan alat masak.
3. Alat masak berbahan aluminium sangat mudah timbul noda apabila terkena kontak langsung dengan air dan makanan yang mengandung mineral tinggi. Mesin pencuci (dishwasher) juga tidak disarankan untuk bahan aluminium. Sebaiknya alat masak dibersihkan dengan spons lembut, sabun pencuci alat dapur, dan air hangat saja (hand washing).
4. Alat masak berbahan aluminium dengan lapisan anti lengeket dapat dicuci dengan mesin pencuci otomatis (dishwasher).
5. Noda dan perubahan warna yang timbul pada alat masak berbahan aluminium dapat dibersihkan menggunakan campuran 2-3 sendok makan cream of tartar atau perasan air jeruk lemon dengan 1 liter air. Tuang campuran ke dalam alat masak dan biarkan selama 5-10 menit. Kemudian bersihkan dengan spons lembut dan sabun pencuci khusus alat dapur. Bilas dan keringkan sampai tuntas.
6. Kuning telur dan arak anggur putih dapat mengakibatkan perubahan warna pada alat masak berbahan aluminium.
Tambahan Informasi Untuk Alat Masak Black Steel
1. Sebelum mulai penggunaan pertama kali, bersihkan alat masak dengan air panas dan sabun cuci. Keringkan dan tuangkan minyak goreng kira-kira 1 centimeter tingginya. Kemudian buang minyak dan bersihkan sisa minyak berlebih dengan tissue kertas khusus makanan dan biarkan olesan minyak pada permukaan alat masak untuk mengaktifkan anti lengket alami pada material Black Steel
2. Semakin sering digunakan, performa anti lengket alami pada alat masak berbahan Black Steel akan semakin baik
3. Gunakan minyak goreng sedikit saja saat memasak karena alat masak berbahan Black Steel mengandung anti lengket alami.
4. Setiap sebelum memasak, panaskan alat masak dan sedikit minyak hingga mencapai suhu yang diinginkan, kemudian masak bahan makanan dan segera turunkan suhu atau kecilkan api untuk mendapatkan suhu seimbang
5. Jangan meninggalkan makanan di dalam alat masak setelah selesai memasak
6. Bahan black steel dapat menyimpan aroma dan rasa dari bumbu rempah. Semakin sering digunakan, penyimpanan aroma dan rasa semakin kuat
7. Gunakan air panas dan spons lembut untuk membersihkan alat masak sehabis pemakaian. Hindari penggunaan sabun cuci dan keringkan alat masak sampai tuntas.
8. Oles tipis-tipis dengan minyak goreng sebelum menyimpan alat masak di tempat kering
9. Jangan merendap alat masak Black Steel di dalam air saat membersihkan karena akan mengakibatkan karat pada permukaan
10. Bersihkan sisa makanan yang menempel dengan spons, dan jangan menggunakan mesin pencuci otomatis (dishwasher)
FAQ
Q: Mengapa ada bercak-bercak putih pada alat masak?
A: AIr yang mengandung kadar kalsium dan zat besi dapat menimbulkan bercak-bercak putih pada permukaan alat masak
Q: Bagaimana cara menghilangkan bercak tersebut?
A: Campurkan 2/3 air dan sedikit cuka ke dalam alat masak, kemudian didihkan hingga panas.
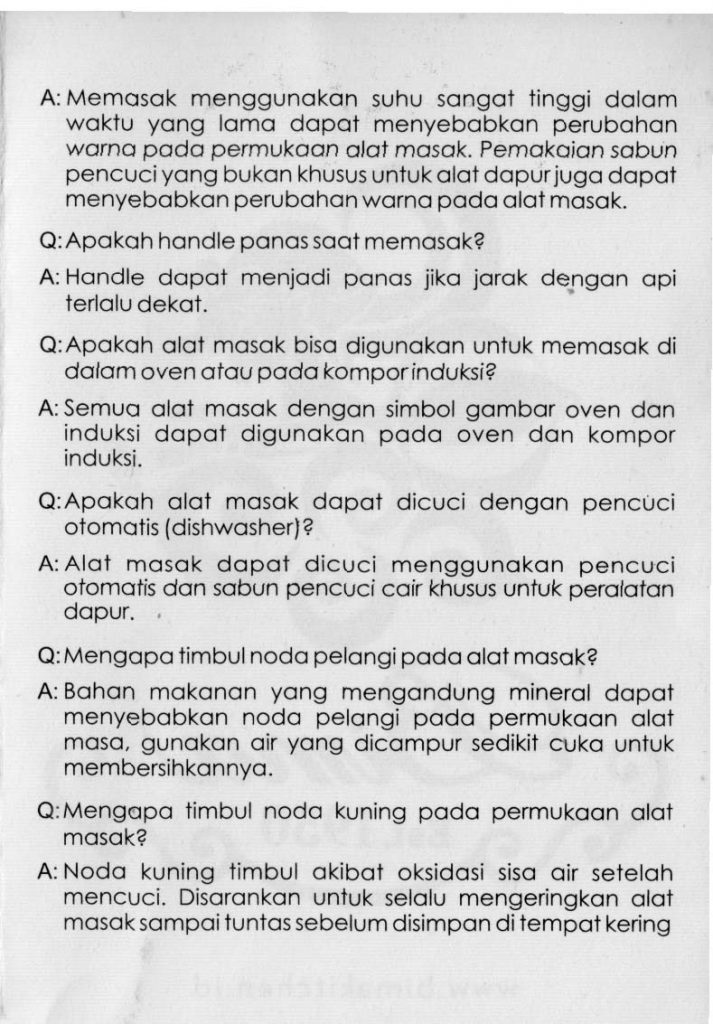
Q: Mengapa warna pada permukaan alat masak berubah?
A: Memasak menggunakan suhu sangat tinggi dalam waktu yang lama dapat menyebabkan perubahan warna pada permukaan alat masak. Pemakaian sabun pencuci yang bukan khusus untuk alat dapur juga dapat menyebabkan perubahan warna pada alat masak.
Q: Apakah handle panas saat memasak?
A: Handle dapat menjadi panas jika jarak dengan api terlalu dekat.
Q: Apakah alat masak bisa digunakan untuk memasak di dalam oven atau pada kompor induksi?
A: Semua alat masak dengan simbol gambar oven dan induksi dapat digunakan pada oven dan kompor induksi.
Q: Apakah alat masak dapat dicuci dengan pencuci otomatis (dishwasher)?
A: Alat masak dapat dicuci menggunakan pencuci otomatis dan sabun pencuci cair khusus untuk peralatan dapur.
Q: Mengapa timbul noda pelangi pada alat masak?
A: Bahan makanan yang mengandung mineral dapat menyebabkan noda pelangi pada permukaan alat masak, gunakan air yang dicampur sedikit cuka untuk membersihkannya.
Q: Mengapa timbul noda kuning pada permukaan alat masak?
A: Noda kuning timbul akibat oksidasi sisa air setelah mencuci. Disarankan untuk selalu mengeringkan alat masak sampai tuntas sebelum disimpan di tempat kering.
Discover ongoing machine learning competitions/data science contests across Kaggle, DrivenData, AICrowd, and other platforms.